Quick start: your first AI post
A ten-minute path from a fresh Aimogen Pro install to a published AI-generated post, using one API key and one bulk rule.
This walkthrough takes a fresh install to one published post. It uses the smallest number of moving parts so that if something breaks, you know exactly where.
You need: Aimogen Pro installed and activated, and one provider API key.
1. Add an API key#
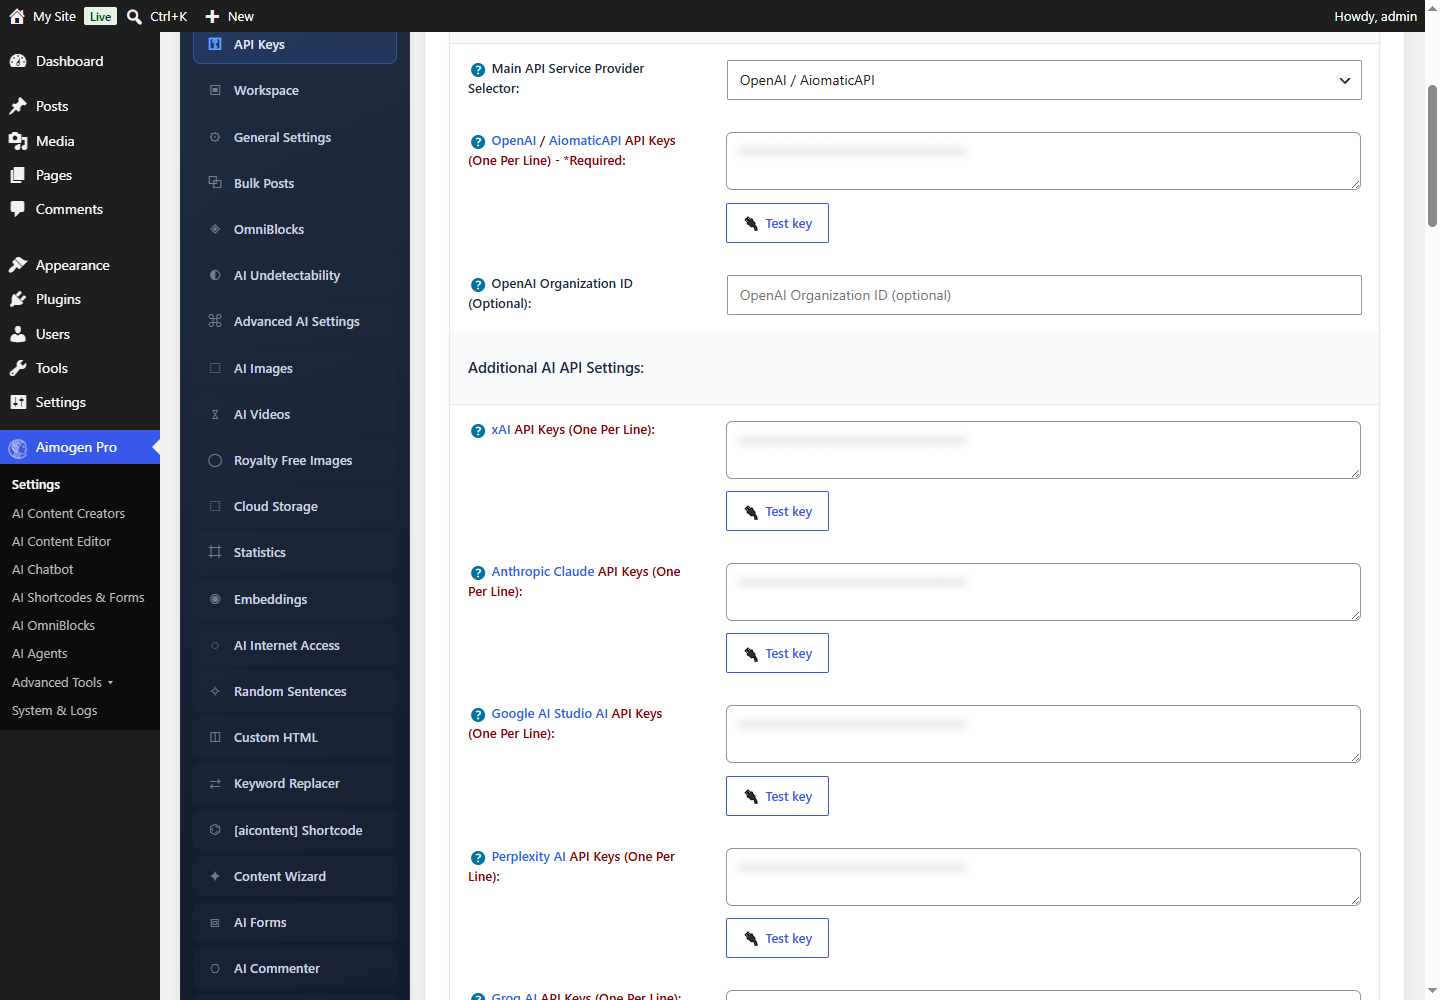
Go to Aimogen Pro › Settings › API Keys.
Find the field for the provider you have an account with. Every provider field accepts one key per line — you can paste several and the plugin will rotate between them.
| Provider | Field label | Get a key |
|---|---|---|
| OpenAI | OpenAI / AiomaticAPI API Keys | platform.openai.com/api-keys |
| Anthropic | Anthropic Claude API Keys | console.anthropic.com |
| Google AI Studio AI API Keys | aistudio.google.com | |
| xAI | xAI API Keys | console.x.ai |
Select Test API key next to the field. You want a success message before going further — an untested key is the single most common reason a scheduled run silently produces nothing.
Save the settings.
2. Confirm the plugin is switched on#
Still in Settings, on the General Settings tab, check that Plugin Main Switch is on. This is a master kill switch: with it off, no menus beyond Settings appear and no generation happens anywhere.
3. Generate one post by hand#
Before automating anything, prove the pipeline works.
Go to Aimogen Pro › AI Content Creators › Express Mode. This screen builds one post interactively, one stage at a time, so you can see exactly where a failure happens.
- Enter a Post Title, for example
Best espresso machines for small kitchens. - Under Post Sections, leave the section count at its default of 2 and select Generate Sections. The AI proposes an outline.
- Select Generate Content. Each section is written out.
- Optionally select Generate Excerpt.
- Set Post Categories, Post Tags and a Featured Image if you want them.
- Select Create Post.
Under Model Settings you can pick the model. Aimogen Pro 2.8.8 defaults to gpt-5-mini; if you
configured a different provider, choose one of its models from the same list.
Each stage takes roughly 10–60 seconds depending on the model.
If nothing happens, go straight to No posts are being created — do not continue to the scheduled setup until a manual run works.
4. Review what was produced#
Open the draft in the editor. Check three things:
- Length and structure. Headings, paragraphs, and a conclusion. If the post is cut off, see Tokens, context and output length.
- Featured image. Only present if you enabled an image source. See Featured images and in-post media.
- Categories and tags. Assigned only if you enabled taxonomy generation.
Publish it, or delete it — the point was to prove the pipeline.
5. Create a repeating rule#
Now automate. Go to AI Content Creators › Keywords/Titles and add a rule.
The essentials:
| Field | Set it to |
|---|---|
| Rule name | Something you will recognise in logs, e.g. Coffee blog — weekly |
| Keyword list | One keyword or title per line |
| AI model | The model you tested in step 1 |
| Post type / status | post / draft while you are still evaluating quality |
| Posts per run | 1 to start |
Save the rule but leave it inactive for now.
Use the Run now action on the rule to execute it immediately. Confirm you get the post you expected. Only then enable the rule so the scheduler picks it up.
See Bulk creator: keywords and titles for every field.
6. Make sure the scheduler will actually run#
Aimogen Pro schedules work through WP-Cron, and WP-Cron only fires when someone visits the site.
Go to System & Logs › System Info and check the cron section. If DISABLE_WP_CRON is defined, or if
the site gets little traffic, set up a real system cron job:
*/5 * * * * curl -s https://example.com/wp-cron.php?doing_wp_cron > /dev/nullFull detail, including the plugin per-minute schedule, is in Scheduling and the posting cron.
7. Watch the first scheduled run#
Two places tell you what happened:
- System & Logs › Activity Logs — one line per rule execution, with errors if any.
- System & Logs › Usage Logs — one row per API request, with model, tokens and estimated price.
If a run fails, the error text there is the real provider error. Match it against API and provider errors.
Where to go next#
Still stuck? Open a support ticket and include the diagnostics from Aimogen Pro › System & Logs › System Info.