Installation
How to install Aimogen Pro on WordPress by upload or FTP, what happens on first activation, and how to verify the install before configuring anything.
Before you start#
Check Requirements. The two that stop installations are PHP older than 7.3 and a host without the cURL extension.
Take a backup if the site is in production. Aimogen Pro creates database tables, registers custom post types and adds a capability to roles on activation.
Install through the WordPress admin#
- Download the plugin ZIP from your WPBay account.
- Go to Plugins › Add New › Upload Plugin.
- Choose the ZIP and select Install Now.
- Select Activate Plugin.
If the upload fails with "The uploaded file exceeds the upload_max_filesize directive", the ZIP is larger
than your PHP upload limit. Use the FTP method instead, or raise upload_max_filesize and
post_max_size.
Install over FTP or SFTP#
- Unzip the download locally. You should get a folder named
aimogen-pro. - Upload that folder to
wp-content/plugins/so the path becomeswp-content/plugins/aimogen-pro/aimogen-pro.php. - Go to Plugins in the WordPress admin and activate Aimogen Pro.
What happens on activation#
Activation is deliberately conservative — nothing is generated and nothing is sent anywhere.
Environment checks. PHP version, WordPress version and the cURL extension are verified. Failure deactivates the plugin and shows the reason.
Database tables. Five tables are created with dbDelta, all prefixed with your table prefix:
| Table | Purpose |
|---|---|
aiomatic_logs | One row per AI request: user, model, mode, units, price, environment |
aiomatic_logmeta | Optional detail rows (prompt and response text) linked to a log row |
aiomatic_agent_runs | Step-by-step execution history for AI Agents |
aimogen_snippets | Snippets created by the AI Snippets Engine |
aiomatict_shortcode_rez | Cache for [aicontent] shortcode results |
See Data model for the full schema.
Default settings. aiomatic_Main_Settings, aiomatic_Spinner_Settings, aiomatic_Chatbot_Settings
and aiomatic_Limit_Settings are seeded if they do not already exist. Existing settings are never
overwritten, which is what makes reactivation safe.
Capability. The access_aiomatic_menu capability is granted to the administrator role, and to any
additional roles you later list in the limits settings. See
Capabilities and roles.
Custom post types. Seventeen internal post types are registered for assistants, personas, forms, agents, embeddings, templates, leads and similar records. They are not publicly queryable and do not appear in your sitemap. See Data model.
Cron. The scheduling events are registered but the posting cron only does work once you create and enable a rule. See Scheduling and the posting cron.
Starter content. On a brand-new install only, guarded by the aiomatic_defaults_imported option, the
plugin imports its shipped defaults: OmniBlock templates, chatbot personas, AI Forms and agent templates.
These come from JSON files in the plugin defaults/ folder. They are editable examples, not required
configuration, and you can delete any of them.
Default workspace. A new install also gets a deliberately lean menu — AI Content Creators, AI Content Editor, AI Chatbot and System & Logs — so the first experience is not thirty menu items. Existing installs upgrading to this version keep their full menu. See Workspace.
Install the free companion plugin#
Aimogen Pro will show a dismissible notice suggesting the free Aimogen plugin. It is optional — see Aimogen Free vs Aimogen Pro. Installing it takes one click from the notice.
Verify the install#
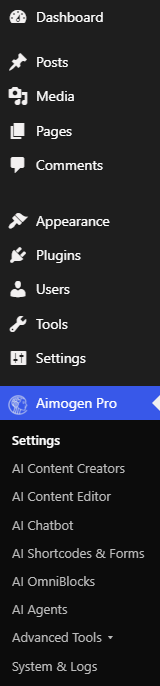
- A top-level Aimogen Pro menu appears in the admin sidebar.
- Open Aimogen Pro › Settings. Before activation you will see only an Activation tab; that is expected. Continue to Activation and licensing.
- After activating the licence, open Aimogen Pro › System & Logs › System Info and confirm PHP version, memory limit, cURL and the WordPress cron status are all sane.
Uninstalling#
Deactivating the plugin stops all cron work and hides the menus but leaves your data intact, so you can reactivate without losing configuration.
Deleting the plugin through WordPress removes the plugin files. Settings, logs, generated posts and the custom tables are not removed automatically — this is deliberate, because generated content is usually the point. To clear plugin data before deleting, use System & Logs › Maintenance, which offers targeted deletion of logs and of posts created by the plugin. See Maintenance and cleanup.
Next: Activation and licensing.
Still stuck? Open a support ticket and include the diagnostics from Aimogen Pro › System & Logs › System Info.