
wordpress
How to Add Author Bios to Your WordPress Theme
It’s becoming increasingly common to see author bios on blogging sites. It helps introduce the reader to the person creating the content and personalizes the information and opinions presented. It also increases trust and respect in the validity of the knowledge being shared and helps increase the page ranking of the site in the eyes of Google.
An author bio is now an accepted trend on the web, especially on multi-author sites. It establishes reputation and trust, which isn’t quite there when all you know is the author’s name. It can also make the reading experience more personal.
Depending on your level of skill and experience, you can either choose to use a plugin where all you need to do is add information and customize the look. Or–if you have the necessary skills–you can add this feature yourself. But a good bio box should be eye catching and attractive. It doesn’t help to have a bio if no one notices it. So here are the possible ways to make it work:
Adding Bios with Plugins
While this option often leaves out customization options, it does mean that adding an author bio is a quick and easy task to carry out.
With a plugin, you can usually change just about any aspect of how the bio looks on screen: text, background colors, the design of the border and which pages of the site you would like to see in the author bio box.
With sharing to social media being one of the main thrusts of a blogging strategy, many of the popular plugins include links or icons to sites such as Facebook, Twitter, LinkedIn and Google+.
A few popular examples include:
- Fanciest Author Box
- Co-Authors Plus
- Simple Author Box
- WP Biographia
- WP Author Bio
- Author Box Reloaded
- Social Author Bio
Creating the Bios Yourself
Here’s a quick breakdown of what you need to do:
- Adding authors
- Editing profiles
- Adding social media information to a profile
- Creating author profiles
To create and edit this content, it all comes down to using the WordPress Dashboard and then the User’s menu.
New author bios
For new authors, it’s simply a case of clicking on ‘Add New’ and then completing the ‘New User’ form. Fill in as many of the fields as possible as it always gives a more professional feel to a bio if it is filled out completely. Once the user logs in, they can fill in any blank fields with their personal information to display to visitors.
Editing an author bio
Editing an existing profile is also straightforward. Admins or users only need to click on Users/Your Profile and the data can be edited. Without the use of a plugin however, there is no one single way for users to link to their social media pages or their own sites. It’s an area WordPress doesn’t offer as a default but can be included into the code.
Adding social media information to a profile
This really is a job for someone who is confident enough to be able to add code to a WordPress theme. It requires adding a code snippet to functions.php.
The result is that input boxes can be created and added to a profile. If this isn’t an area you’re happy tackling, perhaps look at a relevant author bio plugin.
Creating an author bio
Once all the data fields on the user profile are complete, the author bio can be created. It will be displayed under each post and so a file known as a single.php will need to be added. Again, it’s a job for those happy to be working with code; the information needed to combine with the code is:
- Author name
- Author image
- Author bio
- Author website (if relevant)
- Author social media pages
Then, add one more bit of code to single.php (details below) and the outcome will be a completed author bio area. Nifty!
Enabling author bio like a pro (!) – programming
So we’ve gone over a few of the plugin options for creating author bios. Now let’s go over some, perhaps more difficult, programming solutions.
1. Adding Authors to WordPress.
First off, you need to login to the WordPress dashboard and go to the Users menu. Click on Add New.

Fill out the New User form with as much information as possible. The more information you put in, the more information will be shown to visitors. The user will then be able to login to your site and fill out their profile.
2. Editing the Author Profile.
Once the user logs in, they can go to Users -> Your Profile to fill out their information.
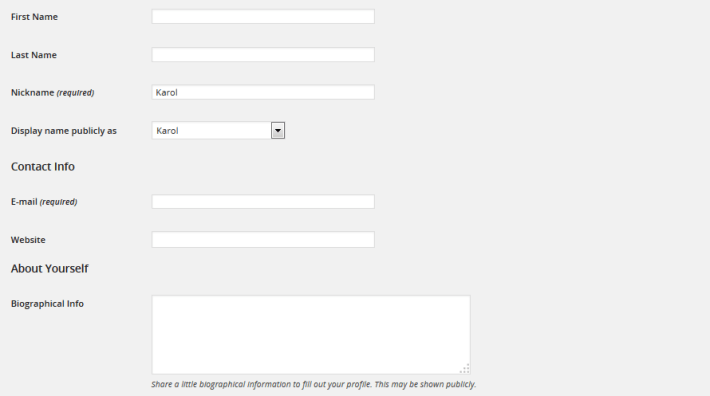
They can fill out the above form with all their contact and biographical information.
Under the contact information area in the user profile, the user can enter their website address, making it easy to link back to them from a post.
That’s all well and good, but many people want to display links to their social media profiles too. This can be added to the users biographical area, but it means they’ll need to type in the HTML by themselves.
By default WordPress doesn’t come with input boxes available to add this user information in the contact area. However, we can add a snippet in the functions.php file to create new input boxes so the user can enter their social media information.
3. Adding Social Media Information to the User Profile.
Copy the code below into the functions.php file to add input boxes for the user social media profiles.
(Note. Always double check your current setup before including the following lines. The theme you’re currently using, or the plugins, could have already enabled some additional social media fields in the user profile.)
Go back to the user profile form and you’ll see new input boxes to add this information.
You’ll also be able to access this data anywhere in your theme by using the get_the_author_meta() function.
4. Creating the Author Bio.
If the user has filled out all the information on the profile page, you should have enough data to create an author bio under all posts they write.
This will be done in the single.php file since we want it to appear under all posts.
Find the the_content() function. All of the author information will go after this point.
In the author area, we need to include the following elements:
The Author’s Name
To display the author’s name, we have a choice between using three different WordPress functions:
- get_the_author() – Returns the author’s display name.
- the_author_link() – Returns the author’s display name with a link to the author’s website.
- the_author_posts_link() – Returns the author’s display name with a link to the author’s about page on your WordPress site.
In this tutorial, we’re going to use the the_author_link() function, so it displays a link to the author’s website too.
The Author’s Image
We’re going to use the author’s gravatar as the image. If they ever change the gravatar, it’ll change for all previous posts too.
To add the author’s gravatar, we can use the WordPress function get_avatar($email, $size). This takes two arguments: email address and size. We can get the author’s email address by using the WordPress function get_the_author_meta( ’email’ ).
The Author’s Bio
The bio is the description provided by the author. We can get this content by using the get_the_author_meta($meta) function.
The Author’s Website
To get the author’s website, we use the same function again, but ask for the website address by using get_the_author_meta($meta) function.
The Author’s Social Media Profiles
We added the social media profiles functionality earlier. We can now access the profiles by using the get_the_author_meta() function. With this data, we are going to create a list of all these profiles so we can display them next to each other. As such, we need to check if this content is set before we add it to the page. The below snippet shows how to get this data.
The Full Author Bio Code
Now that we know how to get all this data, we can put it together to create the author bio area. Place the below code just after the the_content() function in your single.php file.
How do you handle author bio boxes on your blog right now? Do you display them at all?


You must be logged in to post a comment Login