Things to Gather Before Submission
App details:
- Logo: 1024 x 1024 high-resolution image for your app
- Details about the usage of each Permission: You need to provide brief details about why you require a permission and how it is meant to be used.
- Screencast for each permission: Prepare a screencast for each permission that you seek, showing how the permission is used in the app
- Privacy Policy: An accessible website URL that hosts your privacy policy
- Terms and service URL: A valid terms and service URL.
Status and Review:
- General instructions of what your app does.
- Individual notes on each of the additional requested permissions as detailed below.
- Individual steps to replicate functionality for additional requested permissions as detailed below.
- We recommend you include at least 4 screenshots of your in-app experience.
Note: Due to Facebook Restriction we can use the new Facebook App in HTTPS sites only.
To create a new Facebook application ,go to the link https://developers.facebook.com/apps or https://developers.facebook.com/
If you are not a developer, register first
If you are not a developer, you need to register as a developer.

Click on the “Register as a Developer” link (highlighted above).
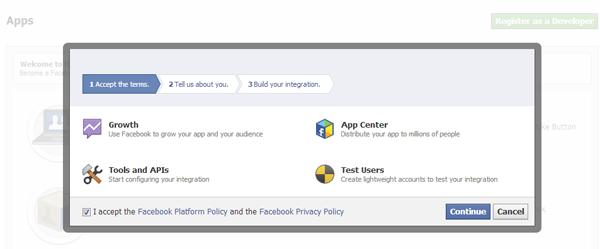
In the first step “Accept the terms” and click continue.
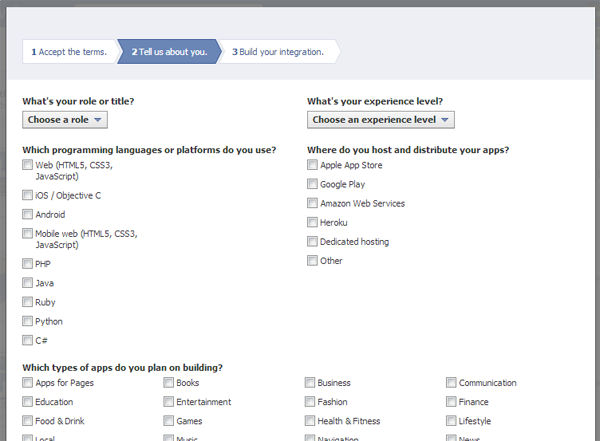
In the second step “Tell us about you”, select the appropriate section and click continue.
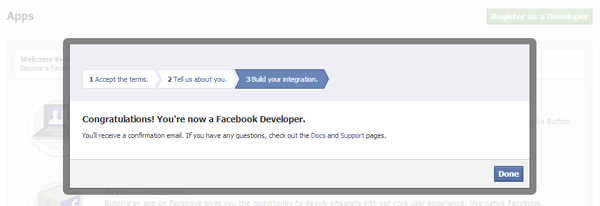
Now you are a Facebook Developer. Click “Done” and you can now create the application.
Create Facebook App
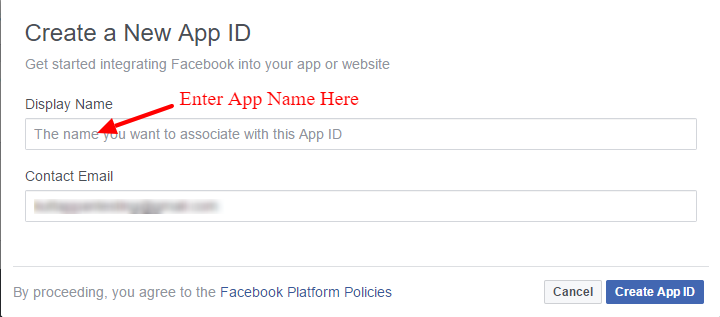
Step 1:
Click on the “Create New App/ Add a New App” link.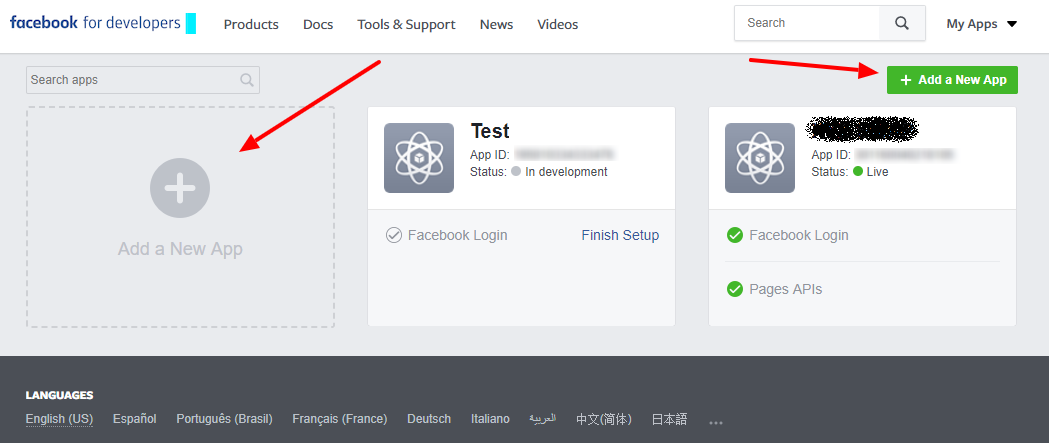
Step 2:
Enter the App Display Name and the contact email and click the “Create App ID”.
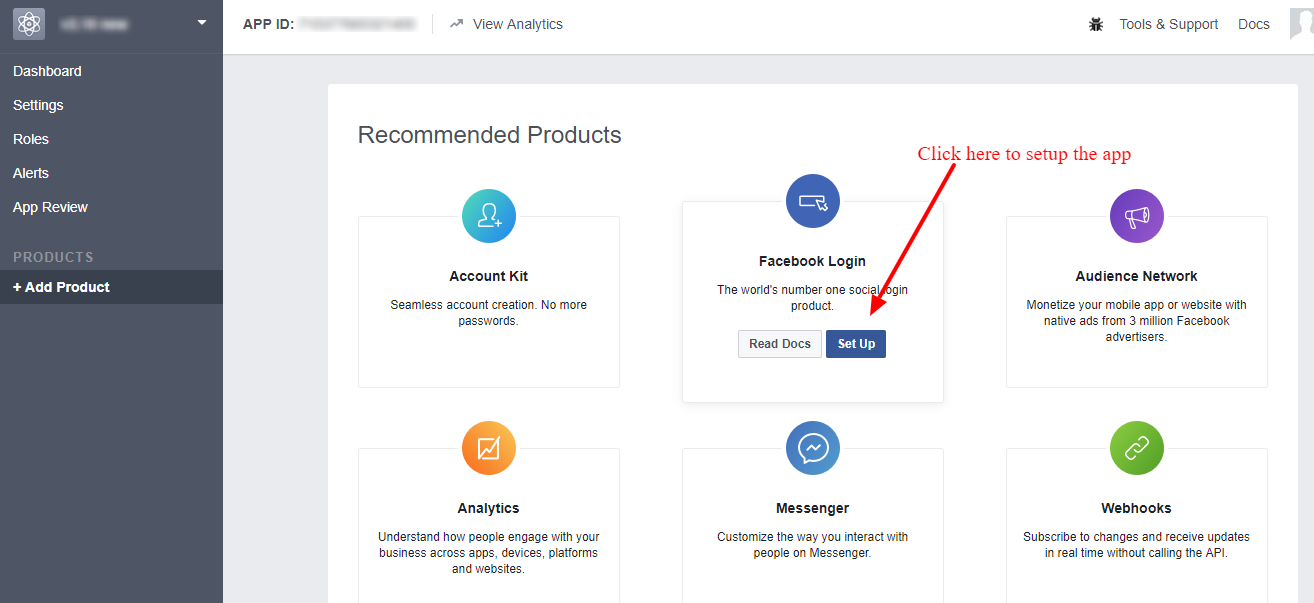
Step 3:
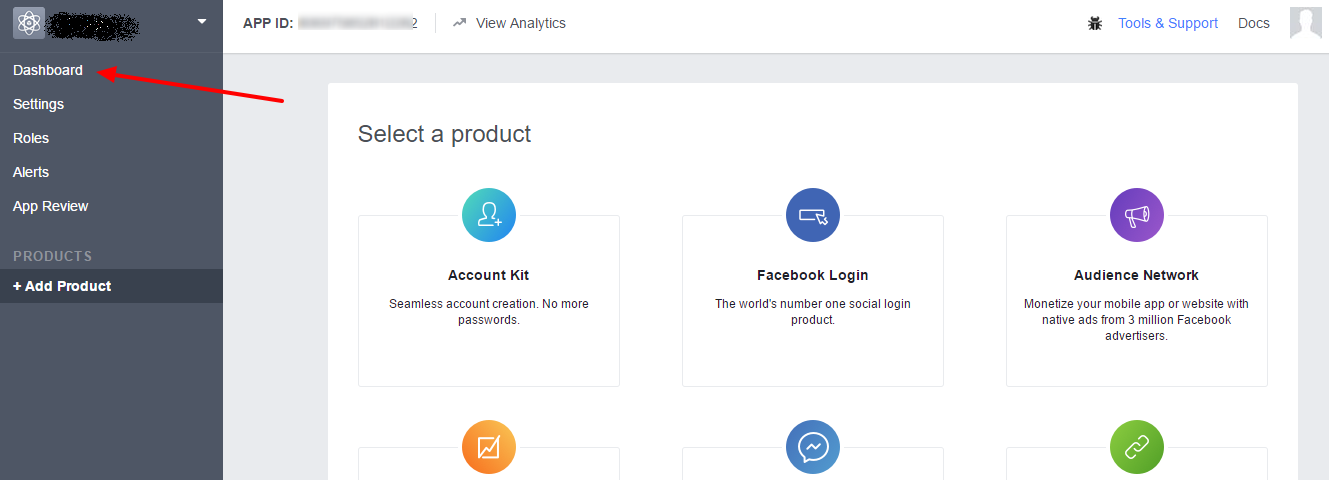
Now it will redirect to the “Add Product” page and in this page click the “Set Up” button in “Facebook Login”.
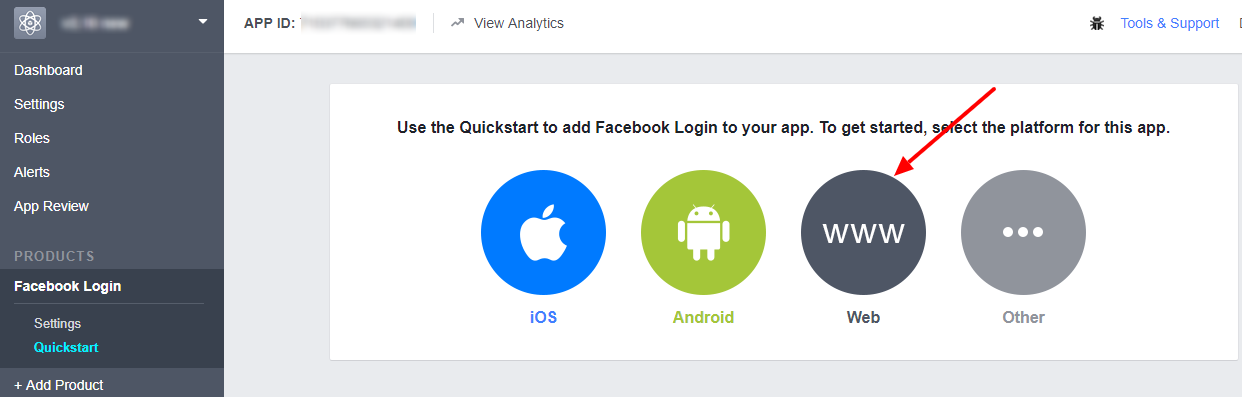
Step 4:
Click the “Web” button.
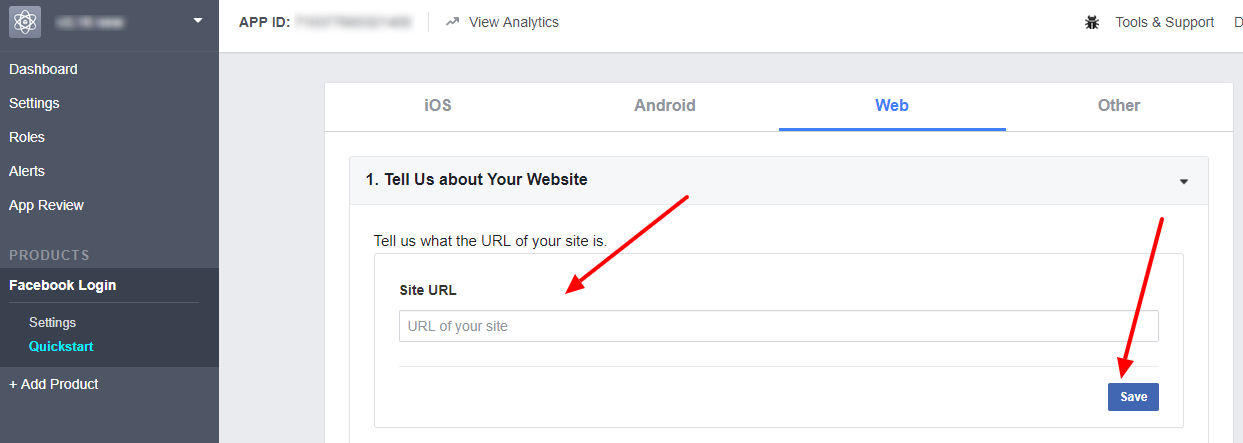
Step 5:
In the “Site URL” section add your site url and save it.
(Note: You can see your site URL in the top of the plugin Facebook settings.)
Note: If the “Quickstart” page is blank and you cannot enter the domain URL, please go to “Settings > Basic” section, just below the Dashboard and then click the “Add Platform” as shown below.
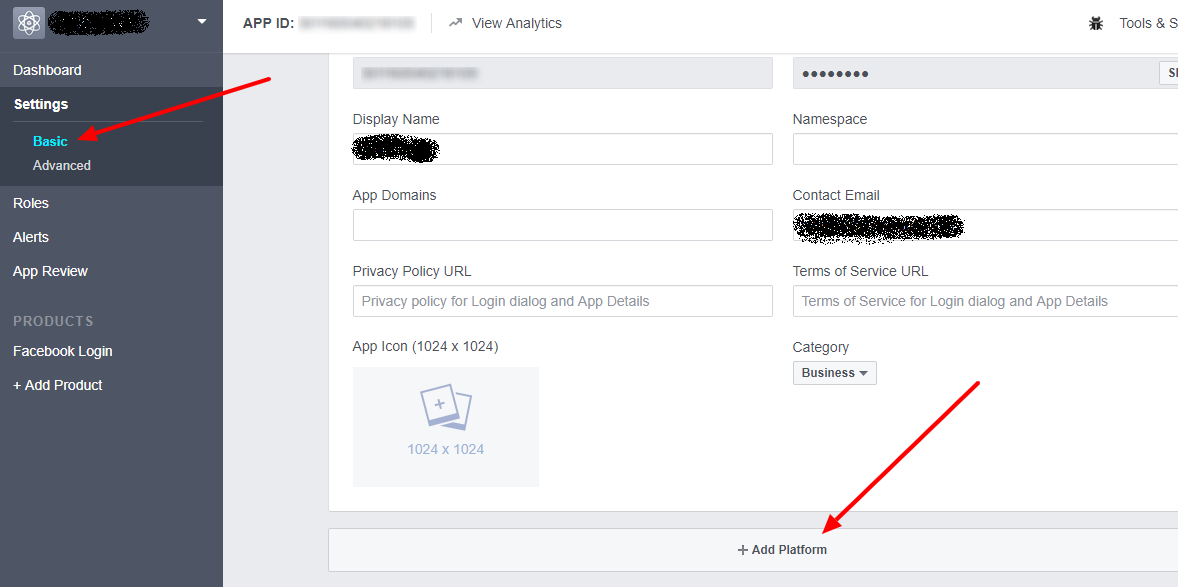
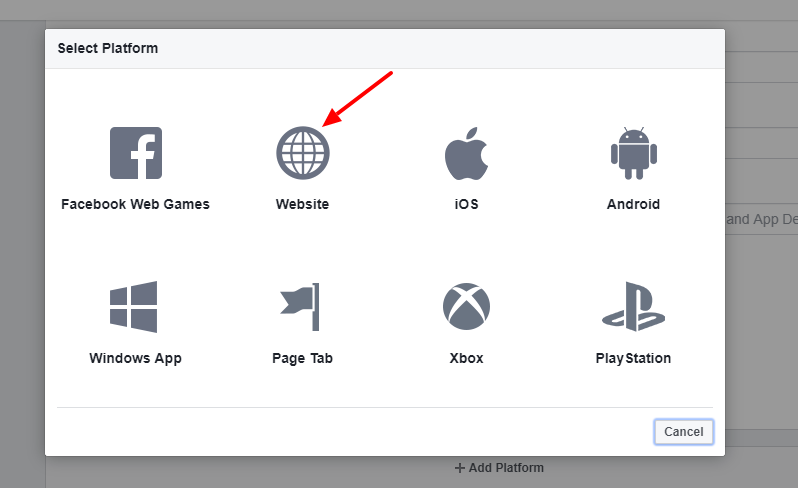
Then select the “website” as given below.
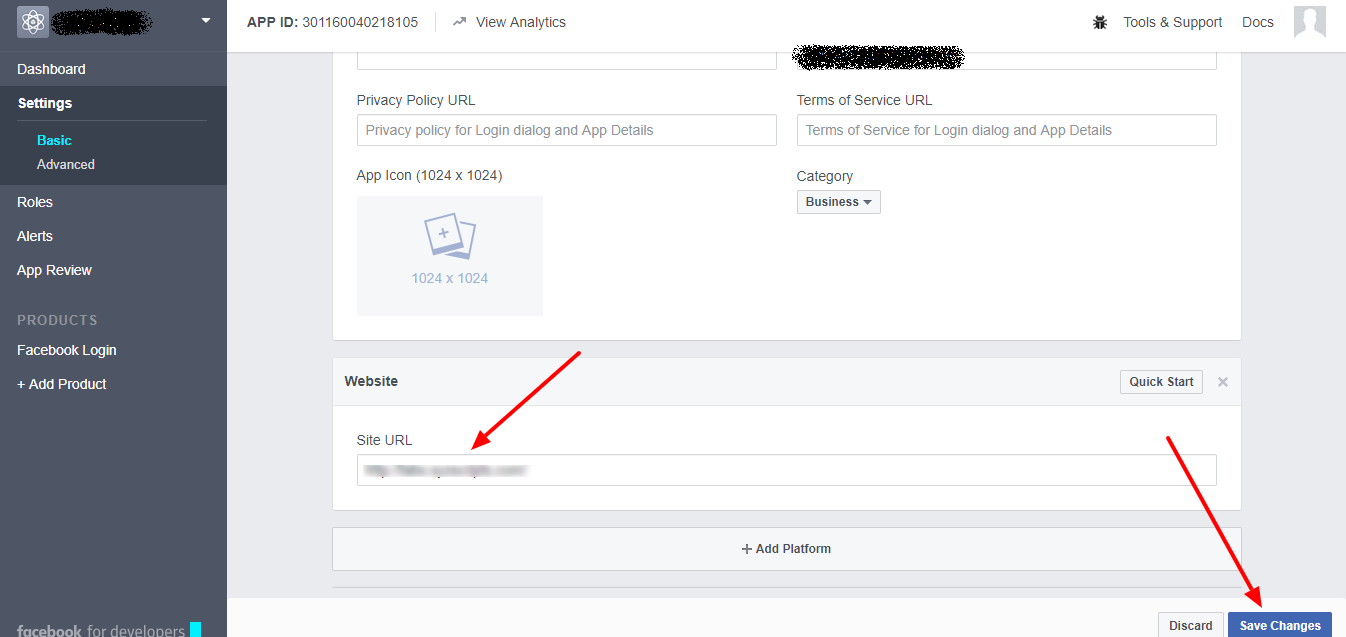
In this page you can add the site URL and save it.
Step 6:
Click on the “Facebook Login >Settings” link as shown below.
Here enter the “Valid OAuth redirect URIs”.
Note : You can see the OAuth redirect URI in the top of the account settings in the plugin.
Please use this OAuth redirect URI in the facebook settings.
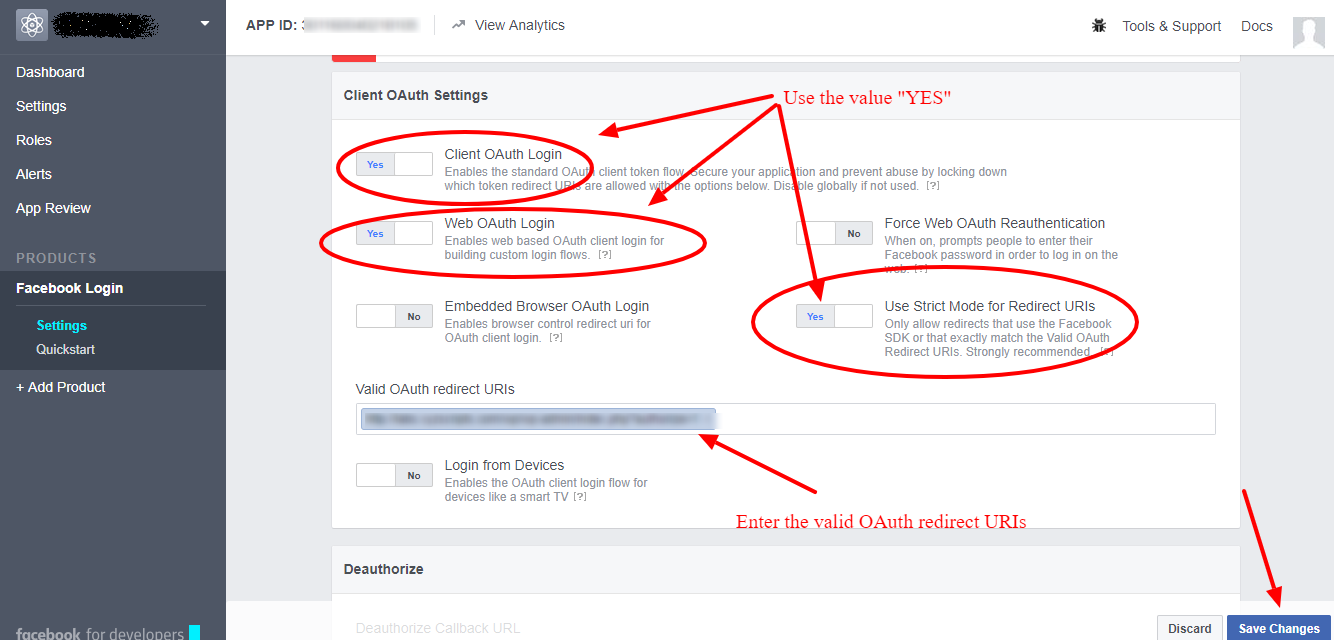
After entering the OAuth redirect URI and enable the “Client OAuth Login and Web OAuth Login”, please save the changes.
Step 7:
The app is ready now. Click the “Dashboard” link in the menu to see the app id and secret.
In the “Dashboard” we can see the App ID and App Secret.
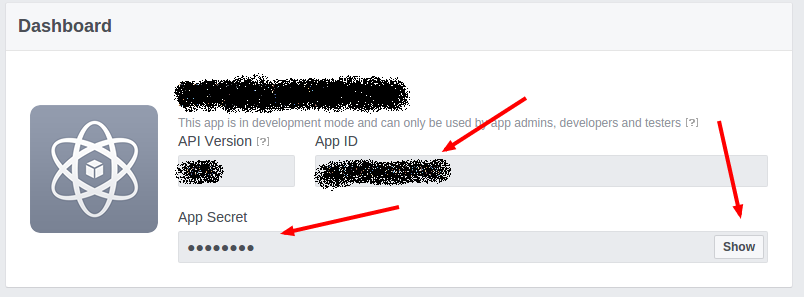
The App ID and App Secret are now ready. Click the “Show”button to see the App Secret. (The app secret is in alphanumeric and DON’T use ******* as App Secret.)
Step 8:
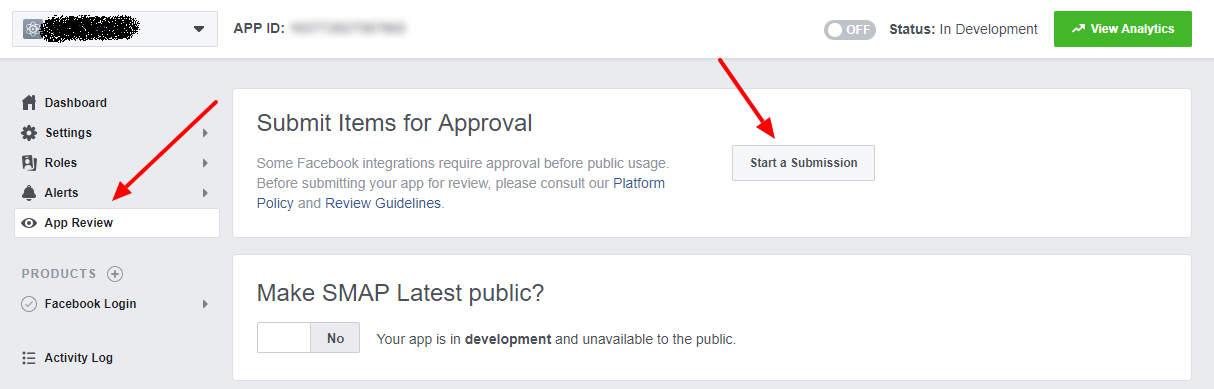
Here the app is in development mode. Only the developer can view the posts now.
We need to “submit the app for approval” and after the app get approved, we can make the app public and the users can see the posts in the Facebook.
The App Review Process Submission is given below.
1: Click on the “App Review” and then the “Start a Submission” button in the “Submit Items for Approval” section.
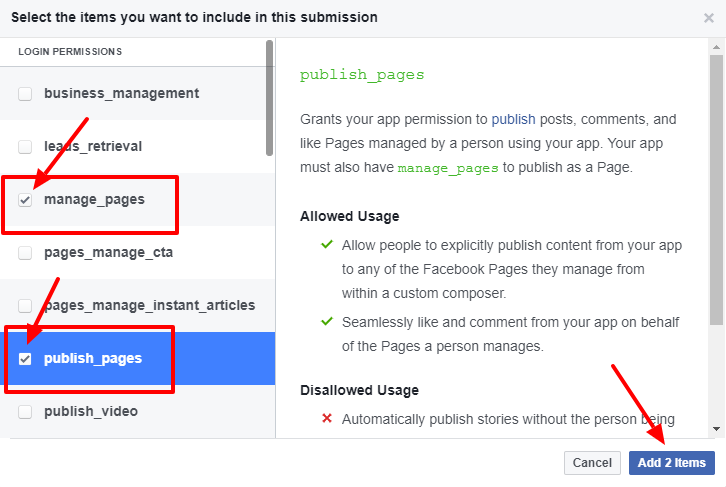
2: If you only wish to publish to Facebook pages you own, In the permissions page please select the login permissions manage_pages, Live Video Feature, publish_video and publish_pages and click on the “Add 2 Items” button. If you wish to publish to groups, you will need these permissions for publishing the posts to groups – groups_access_member_info, Live Video Feature, publish_video, publish_to_groups and Groups API.
3: Now you can see the current submissions and it is asking to “Add Details” of each item.
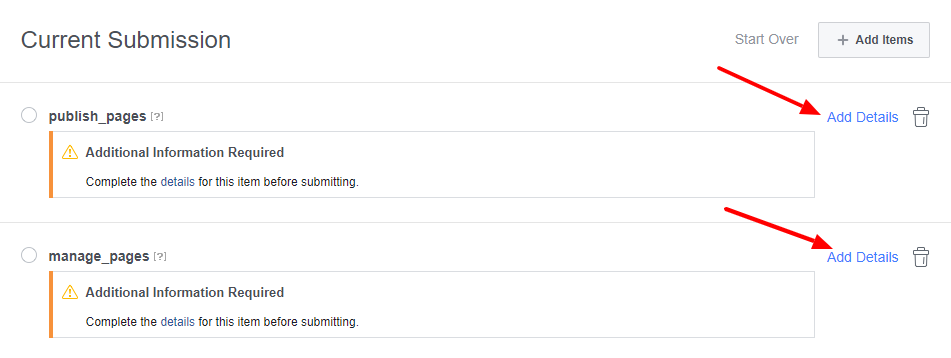
4. Click on the “Add Details” link and you can add the details of each item.
4 A : Details for publish_pages
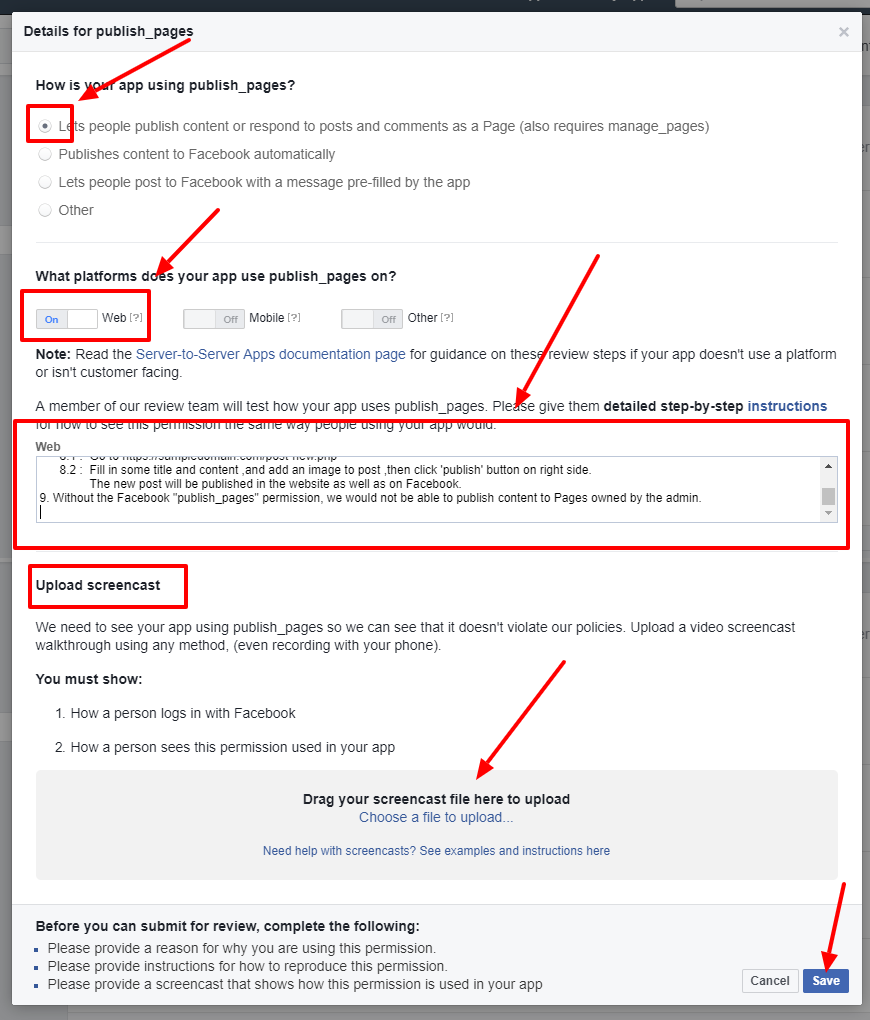
- For the question “How is your app using publish_pages?”, please select the first answer “Lets people publish content or respond to posts and comments as a Page (also requires manage_pages)”.
- For the question “What platforms does your app use publish_pages on?”, please turn on the Web.
- In the detailed step-by-step instructions, please use the detailed steps.
The publish_pages permission is used to create live events on pages by the app.A Sample detailed step-by-step instructions are given below:- Go to https://DOMAIN.com/wp-login.php
- Login as an administrator with user name : <user name> and password: <password>
- Go to https://DOMAIN.com/wp-admin/admin.php?page=facelive_admin_settings where user has to add Facebook App ID and Secret.
- Save settings.
- Go to https://DOMAIN.com/wp-admin/admin.php?page=facelive_facebook_panel where user has to authorize the application from the plugin’s settings page, following the steps suggested by the plugin.
- Follow required steps, then click on the button ‘Authorize the App’ button.
- It will take you to Facebook authorization procedure.
- Upon successful authorization ,if you manage Facebook pages, you will be prompted to select the facebook pages to which you need updates to be published.
- After selecting Facebook pages , save settings.
- After the authorization is complete,make a post in website by following below steps,
10.1 : Go to https://DOMAIN.com/post-new.php
10.2 : Fill in some title and content ,and add an image to post ,then click ‘publish’ button on right side.
The new post will be published in the website as well as on Facebook.
10.3 : Without the Facebook “publish_pages” permission, we would not be able to publish content to Pages owned by the admin.
- Now upload a video screencast of the above procedure.
- After adding the details click on the save button.
Here is the demo login account for you to check
Login URL : https://yourdomain.com/home/login_page
Email : login@yourdomain.com
Password : XXXXXXX
Thanks for your Kind Review.
SCREENCAST EXAMPLE:
4 B : Details for manage_pages
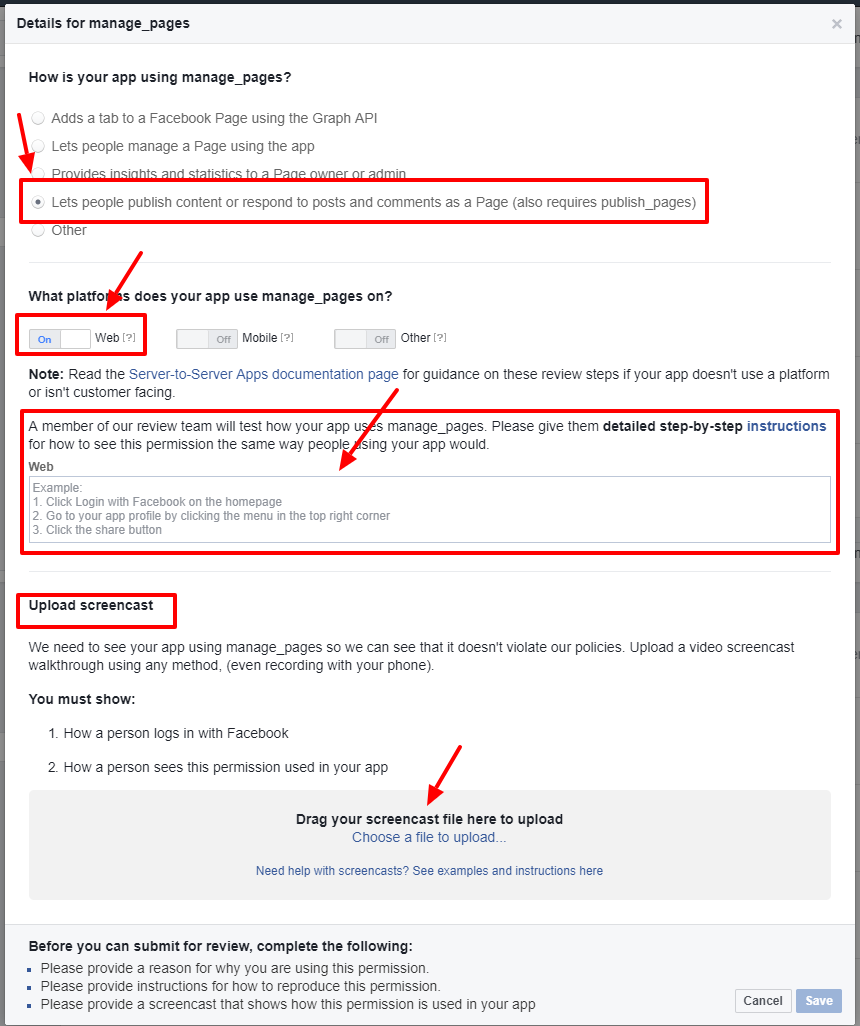
- For the question “How is your app using manage_pages?”, please select the first answer “This app is used in a WordPress plugin (FaceLive). It lets people publish content or respond to posts and comments as a Page (also requires publish_pages)”.
- For the question “What platforms does your app use manage_pages on?”, please turn on the Web.
- In the detailed step-by-step instructions, please use the detailed steps.
The manage_pages permission is used to list pages associated with the app. A Sample detailed step-by-step instructions are given below:- Go to https://DOMAIN.com/wp-login.php
- Login as an administrator with user name : <user name> and password: <password>
- Go to https://DOMAIN.com/wp-admin/admin.php?page=facelive_admin_settings where user has to add Facebook App ID and Secret.
- Save settings.
- Go to https://DOMAIN.com/wp-admin/admin.php?page=facelive_facebook_panel where user has to authorize the application from the plugin’s settings page, following the steps suggested by the plugin.
- Follow required steps, then click on the button ‘Authorize the App’ button.
- It will take you to Facebook authorization procedure.
- Upon successful authorization ,if you manage Facebook pages, you will be prompted to select the facebook pages to which you need updates to be published.
- After selecting Facebook pages , save settings.
- After the authorization is complete,make a post in website by following below steps,
10.1 : Go to https://DOMAIN.com/post-new.php
10.2 : Fill in some title and content ,and add an image to post ,then click ‘publish’ button on right side.
The new post will be published in the website as well as on Facebook.
10.3 : Without the Facebook “manage_pages” permission, we would not be able to publish content to Pages owned by the admin.
- Now upload a video screencast of the procedure.
- After adding the details click on the save button.
Here is the demo login account for you to check
Login URL : https://yourdomain.com/home/login_page
Email : login@yourdomain.com
Password : XXXXXXX
Thanks for your Kind Review.
SCREENCAST EXAMPLE:
4C : Details for groups_access_member_info (Only if you wish to publish to groups)
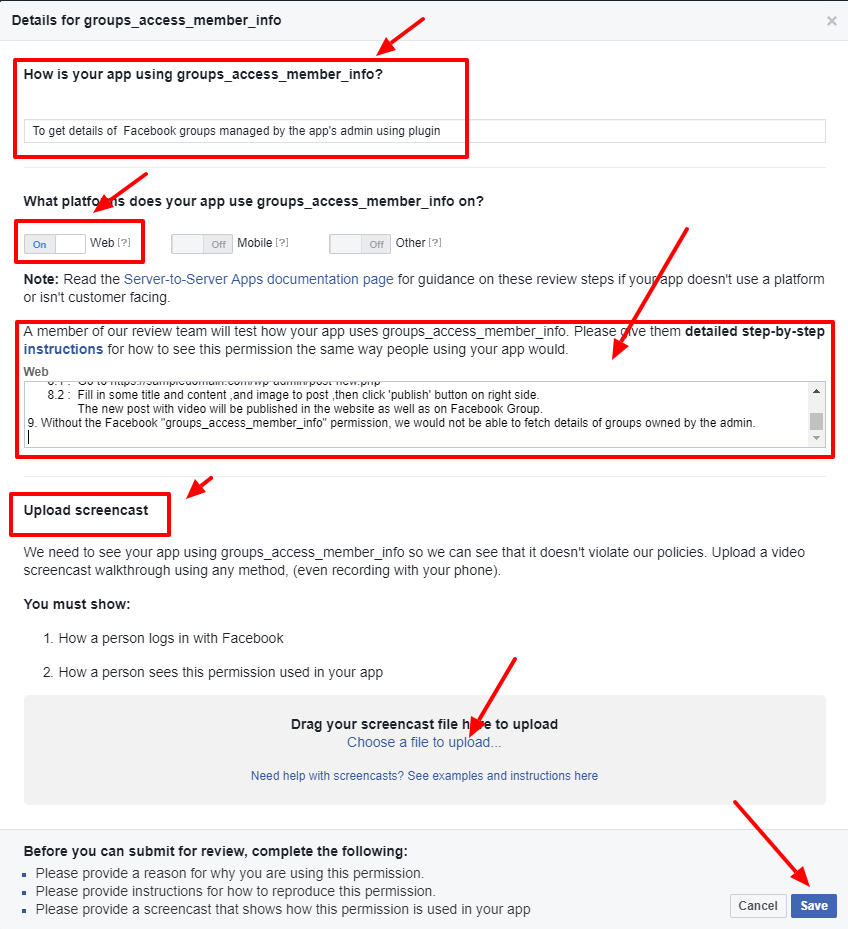
- For the question “How is your app using groups_access_member_info?” use the answer “This app is used in a WordPress plugin (FaceLive). To get details of Facebook groups managed by the app’s admin using plugin.”
- For the question “What platforms does your app use groups_access_member_info on?”, please turn on the Web.
- In the detailed step-by-step instructions, please use the detailed steps. The groups_access_member_info permission is used to manage and list groups associated with the app. A Sample detailed step-by-step instructions are given below:
- Go to https://DOMAIN.com/wp-login.php
- Login as an administrator with user name : <user name> and password: <password>
- Go to https://DOMAIN.com/wp-admin/admin.php?page=facelive_admin_settings where user has to add Facebook App ID and Secret.
- Save settings.
- Go to https://DOMAIN.com/wp-admin/admin.php?page=facelive_facebook_panel where user has to authorize the application from the plugin’s settings page, following the steps suggested by the plugin.
- Follow required steps, then click on the button ‘Authorize the App’ button.
- It will take you to Facebook authorization procedure.
- Upon successful authorization ,if you manage Facebook pages, you will be prompted to select the facebook pages to which you need updates to be published.
- After selecting Facebook pages , save settings.
- After the authorization is complete,make a post in website by following below steps,
10.1 : Go to https://DOMAIN.com/post-new.php
10.2 : Fill in some title and content ,and add an image to post ,then click ‘publish’ button on right side.
The new post will be published in the website as well as on Facebook.
10.3 : Without the Facebook “groups_access_member_info” permission, we would not be able to fetch details of groups owned by the admin.
4. Now upload a video screencast of the procedure.
5. After adding the details click on the save button.
Here is the demo login account for you to check
Login URL : https://yourdomain.com/home/login_page
Email : login@yourdomain.com
Password : XXXXXXX
Thanks for your Kind Review.
PLEASE CREATE A SCREENCAST WHERE THE FULL UPLOADING PROCESS TO THE FACEBOOK GROUP CAN BE SEEN.
4D : Details for publish_to_groups (Only for publishing to groups)
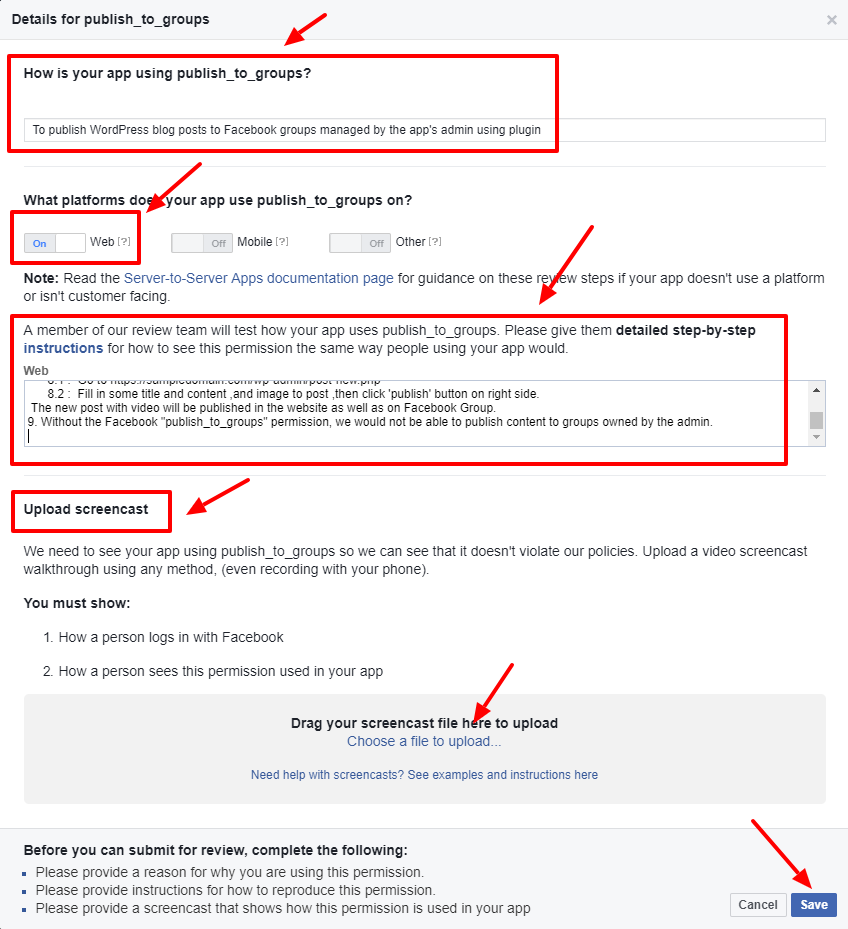
- For the question “How is your app using publish_to_groups?” use the answer “This app is used in a WordPress plugin (FaceLive). To publish WordPress blog posts to Facebook groups managed by the app’s admin using plugin”
- For the question “What platforms does your app use publish_to_groups on?”, please turn on the Web.
- In the detailed step-by-step instructions, please use the detailed steps. The publish_video permission is used to broadcast live videos by the app. A Sample detailed step-by-step instructions are given below:
- Go to https://DOMAIN.com/wp-login.php
- Login as an administrator with user name : <user name> and password: <password>
- Go to https://DOMAIN.com/wp-admin/admin.php?page=facelive_admin_settings where user has to add Facebook App ID and Secret.
- Save settings.
- Go to https://DOMAIN.com/wp-admin/admin.php?page=facelive_facebook_panel where user has to authorize the application from the plugin’s settings page, following the steps suggested by the plugin.
- Follow required steps, then click on the button ‘Authorize the App’ button.
- It will take you to Facebook authorization procedure.
- Upon successful authorization ,if you manage Facebook pages, you will be prompted to select the facebook pages to which you need updates to be published.
- After selecting Facebook pages , save settings.
- After the authorization is complete,make a post in website by following below steps,
10.1 : Go to https://DOMAIN.com/post-new.php
10.2 : Fill in some title and content ,and add an image to post ,then click ‘publish’ button on right side.
The new post will be published in the website as well as on Facebook.
10.3 : Without the Facebook “publish_to_groups” permission, we would not be able to publish content to groups owned by the admin.
4. Now upload a video screencast of the procedure.
5. After adding the details click on the save button.
Here is the demo login account for you to check
Login URL : https://yourdomain.com/home/login_page
Email : login@yourdomain.com
Password : XXXXXXX
Thanks for your Kind Review.
PLEASE CREATE A SCREENCAST WHERE THE FULL UPLOADING PROCESS TO THE FACEBOOK GROUP CAN BE SEEN.
4E : Details for Groups API (Only for publishing to groups)

- For the question “Please explain how you are using Groups API to enhance the experience of your app.” use the answer “This app is used in a WordPress plugin (FaceLive). To get the groups details and publish WordPress blog posts to Facebook groups managed by the app’s admin using plugin.”
- For the question “What platforms does your app use Groups API on?”, please turn on the Web.
- In the detailed step-by-step instructions, please use the detailed steps. The Groups API permission is used to access groups related data from the app. A Sample detailed step-by-step instructions are given below:
- Go to https://DOMAIN.com/wp-login.php
- Login as an administrator with user name : <user name> and password: <password>
- Go to https://DOMAIN.com/wp-admin/admin.php?page=facelive_admin_settings where user has to add Facebook App ID and Secret.
- Save settings.
- Go to https://DOMAIN.com/wp-admin/admin.php?page=facelive_facebook_panel where user has to authorize the application from the plugin’s settings page, following the steps suggested by the plugin.
- Follow required steps, then click on the button ‘Authorize the App’ button.
- It will take you to Facebook authorization procedure.
- Upon successful authorization ,if you manage Facebook pages, you will be prompted to select the facebook pages to which you need updates to be published.
- After selecting Facebook pages , save settings.
- After the authorization is complete,make a post in website by following below steps,
10.1 : Go to https://DOMAIN.com/post-new.php
10.2 : Fill in some title and content ,and add an image to post ,then click ‘publish’ button on right side.
The new post will be published in the website as well as on Facebook.
10.3 : Without the Facebook “Groups API” , we would not be able to get group details and publish content to groups owned by the admin
4. Now upload a video screencast of the procedure.
5. After adding the details click on the save button.
Here is the demo login account for you to check
Login URL : https://yourdomain.com/home/login_page
Email : login@yourdomain.com
Password : XXXXXXX
Thanks for your Kind Review.
PLEASE CREATE A SCREENCAST WHERE THE FULL UPLOADING PROCESS TO THE FACEBOOK GROUP CAN BE SEEN.
4F : Details for Live Video Feature
- For the question “Please explain how you are using Live Video Feature to enhance the experience of your app.” use the answer “This app is used in a WordPress plugin (FaceLive). To get the groups details and publish WordPress blog posts to Facebook groups managed by the app’s admin using plugin.”
- For the question “What platforms does your app use Live Video Feature on?”, please turn on the Web.
- In the detailed step-by-step instructions, please use the detailed steps. The Live Video Feature permission is used to broadcast live videos by the app. A Sample detailed step-by-step instructions are given below:
- Go to https://DOMAIN.com/wp-login.php
- Login as an administrator with user name : <user name> and password: <password>
- Go to https://DOMAIN.com/wp-admin/admin.php?page=facelive_admin_settings where user has to add Facebook App ID and Secret.
- Save settings.
- Go to https://DOMAIN.com/wp-admin/admin.php?page=facelive_facebook_panel where user has to authorize the application from the plugin’s settings page, following the steps suggested by the plugin.
- Follow required steps, then click on the button ‘Authorize the App’ button.
- It will take you to Facebook authorization procedure.
- Upon successful authorization ,if you manage Facebook pages, you will be prompted to select the facebook pages to which you need updates to be published.
- After selecting Facebook pages , save settings.
- After the authorization is complete,make a post in website by following below steps,
10.1 : Go to https://DOMAIN.com/post-new.php
10.2 : Fill in some title and content ,and add an image to post ,then click ‘publish’ button on right side.
The new post will be published in the website as well as on Facebook.
10.3 : Without the Facebook “Live Video Feature” , we would not be able to get group details and publish content to groups owned by the admin
4. Now upload a video screencast of the procedure.
5. After adding the details click on the save button.
Here is the demo login account for you to check
Login URL : https://yourdomain.com/home/login_page
Email : login@yourdomain.com
Password : XXXXXXX
Thanks for your Kind Review.
SCREENCAST EXAMPLE:
4G : Details for publish_video
- For the question “Please explain how you are using publish_video to enhance the experience of your app.” use the answer “This app is used in a WordPress plugin (FaceLive). To get the groups details and publish WordPress blog posts to Facebook groups managed by the app’s admin using plugin.”
- For the question “What platforms does your app use publish_video on?”, please turn on the Web.
- In the detailed step-by-step instructions, please use the detailed steps. The publish_video permission is used to broadcast live videos by the app. A Sample detailed step-by-step instructions are given below:
- Go to https://DOMAIN.com/wp-login.php
- Login as an administrator with user name : <user name> and password: <password>
- Go to https://DOMAIN.com/wp-admin/admin.php?page=facelive_admin_settings where user has to add Facebook App ID and Secret.
- Save settings.
- Go to https://DOMAIN.com/wp-admin/admin.php?page=facelive_facebook_panel where user has to authorize the application from the plugin’s settings page, following the steps suggested by the plugin.
- Follow required steps, then click on the button ‘Authorize the App’ button.
- It will take you to Facebook authorization procedure.
- Upon successful authorization ,if you manage Facebook pages, you will be prompted to select the facebook pages to which you need updates to be published.
- After selecting Facebook pages , save settings.
- After the authorization is complete,make a post in website by following below steps,
10.1 : Go to https://DOMAIN.com/post-new.php
10.2 : Fill in some title and content ,and add an image to post ,then click ‘publish’ button on right side.
The new post will be published in the website as well as on Facebook.
10.3 : Without the Facebook “publish_video” , we would not be able to get group details and publish content to groups owned by the admin
4. Now upload a video screencast of the procedure.
5. After adding the details click on the save button.
Here is the demo login account for you to check
Login URL : https://yourdomain.com/home/login_page
Email : login@yourdomain.com
Password : XXXXXXX
Thanks for your Kind Review.
SCREENCAST EXAMPLE:
4 H : App Verification Details (Optional)
This permission is already enabled and if you want to add a test user, you can add the test user here.
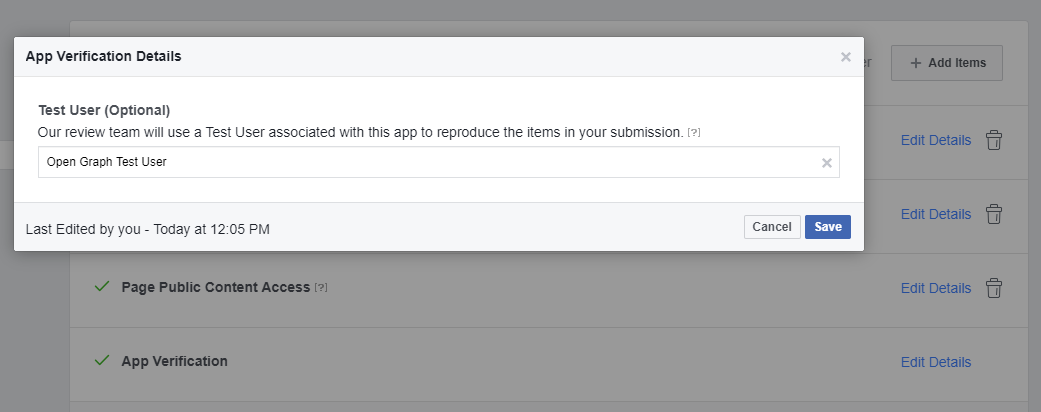
There is a test user “Open Graph Test User” by default.
Now you can see the additional items to enter.

Please click on the settings link in the section and you can see the App Icon, Privacy Policy URL, Category etc.
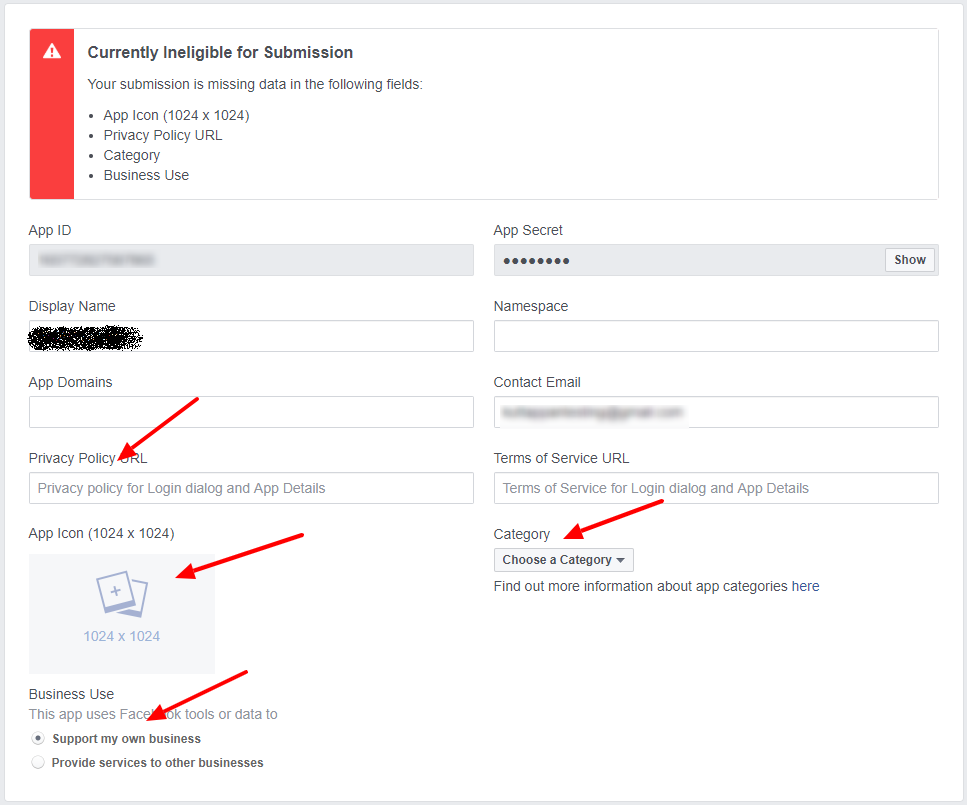
After entering the details, please save it. Now we can submit the app for review.
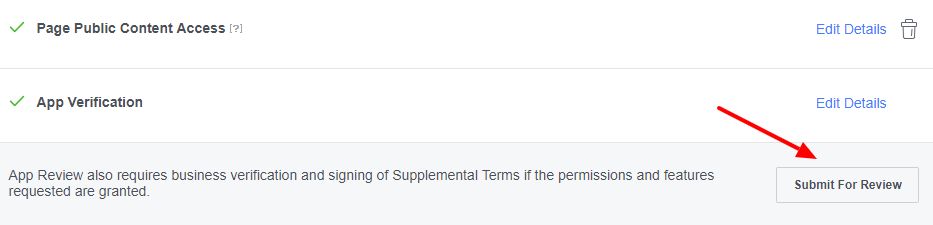
Accept the terms and submit. The app is now submitted for approval.
Note: It may take some to get the app approved by facebook. (1 week – 3 months).
One the app get approved, please make the app live.
To make the app ‘Live/Public’, please go to the ‘App Review‘ page.
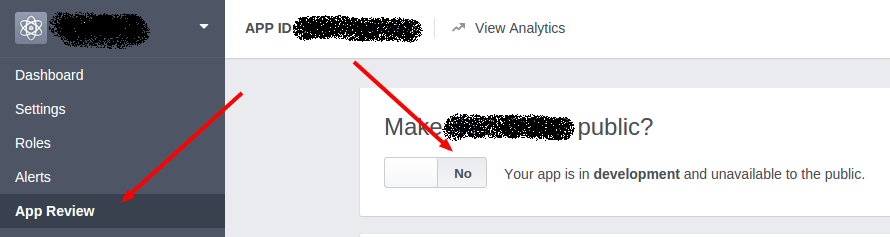
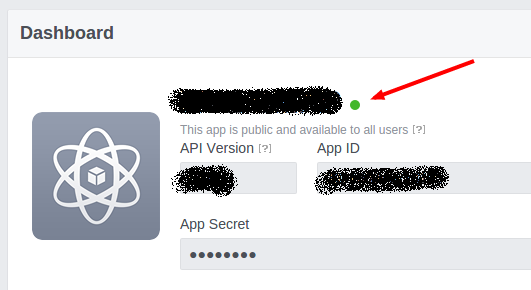
In this page please select the ‘Live/Public’ mode by selecting the ‘YES’ button and a ‘green indicator’ will display next to the app name as in the below image.
You can now use the facebook app keys in the plugin.
Now enter these keys in the plugin settings in your site.
After entering the keys in the facebook settings page, you need to “Authorize” the account. (The authorization section is present in the wordpress plugin section).
You can see the Facebook pages in the settings page only after authorizing Facebook account.
When you click on the “Authorize” button, it will redirect to a facebook popup dialog box.
Step 1:
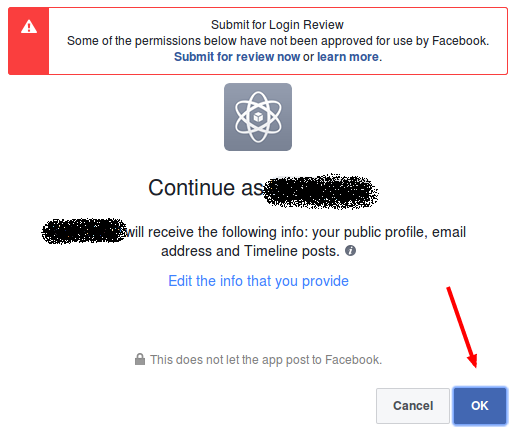
There is some warnings and you can ignore the warning and click the “OK” button.
Step 2:
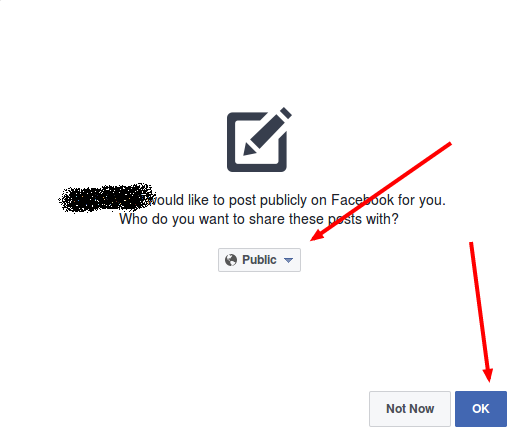
Select the “Public” option and click OK.
Step 3:
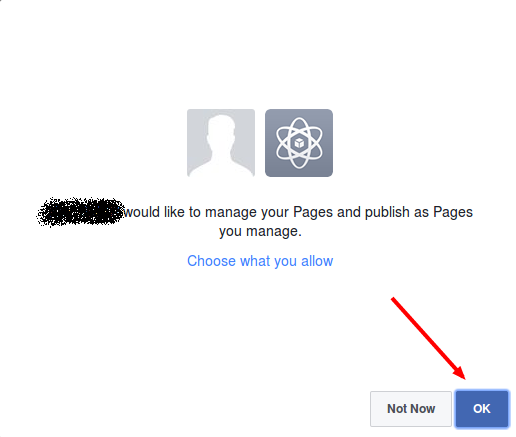
In the step 3 click OK and the authorization is complete.
Now you can see all your Facebook pages and you can select the Facebook page (or group) to auto publish.
You can also check a tutorial video on the approval process (Facebook app submission not included):
