Check Plugin Documentation
Get started quickly with our comprehensive guides
About this plugin
This plugin will allow you to build from scratch an autoblogging system, based on Best Buy feeds you define (based on keywords and search terms).
This plugin provides one solution to the ongoing search for new blog content. It not only provides a steady stream of rich, searchable content, it also helps to keep your website up to date with the latest uploaded items. You can build rules that will generate posts that are near to unique in website crawlers’s eyes. They require none to very little customization.
The goal is to achieve the following:
Bestbuyomatic Automatic Post Generator will import items from any content from public Best Buy feeds, you define to your blog, based on search keywords. Resulting blog posts are fully customizable and rich in content. List of customizable stuff for each post:
- post content – including the responsive embedded Best Buy media preview
- wide range of item search options: search based on a search term, category, product id, recommended items, trending items, preorder items, best seller items, special buy items and many other search attributes!
- post author user name
- post status (published, draft, pending, private, trash)
- automatically generate post categories or tags from Best Buy posts
- manually add post categories or tags to items
- generate post or page or any other custom post type
- automatically generate a featured image for the post
- enable/disable comments for the generated post
- enable/disable pingbacks/trackbacks for the generated post
- customize post title and content (with the included wide variaty of relevant post shortcodes)
Other plugin features:
- Google Translate support ‘ select the language in which you want to post your articles
- Text Spinner support ‘ automatically modify generated text, changing words with their synonyms ‘ great SEO value!
- Using Native Best Buy API
- Keyword Replacer (replace relevant keywords with your links)
- Random sentence generator (relevant sentences – as you define them)
- detailed plugin activity logging
- scheduled rule runs
This plugin needs an Affiliate ID for you to get revenue for item sales. But how to get one?
You can get an API KEY here (fill in the required forms).
Also, you can get an Affiliate ID here (fill in the required forms – this is optional, but if you do not enter an affiliate key, you won’t earn revenue from product sales generated by your website.
How to get your Best Buy Publisher ID?
To register to Best Buy affiliate program, click here: https://app.impact.com/secure/mediapartner/marketplace/new-campaign-marketplace-flow.ihtml?execution=e3s1#/all/q=best%20buy
once approved,visit your affiliate dashboard here
Then click on your name in the top left part of the page and a dropdown will appear with your affiliate ID.

Copy the Partner ID into the plugin and start earning!
Plugin requirements:
php CURL extension (install to Debian/Ubuntu etc with apt-get install php5-curl )
WordPress installation
Youtube video tutorial:
I also provided a Quick Install Guide to feature an easy plugin installation for everyone.
To make this plugin work, first, you’ll need to install the plugin. The easiest method is to take the .zip file you’ve downloaded and upload it via Plugins > Add New > Upload Plugin in the WordPress Dashboard. Once the plugin is installed, be sure to Activate it.
Now that you’ve installed and activated the plugin, you’ll see a new menu item created inside WordPress called ‘Bestbuyomatic Automatic Post Generator’. First thing first, let’s head over to Settings > Bestbuyomatic Automatic Post Generator and take a look at what options are available.
Plugin Settings
Refreshingly, Bestbuyomatic Automatic Post Generator has a super-simple settings screen. Let’s look at first at the settings panel:
Here you can find the steps needed in configuring your plugin even if you have no HTML knowledge at all. You can find options for:
HINT! Don’t forget to click the Save button every time you modified your settings, otherwise the modifications will be lost!
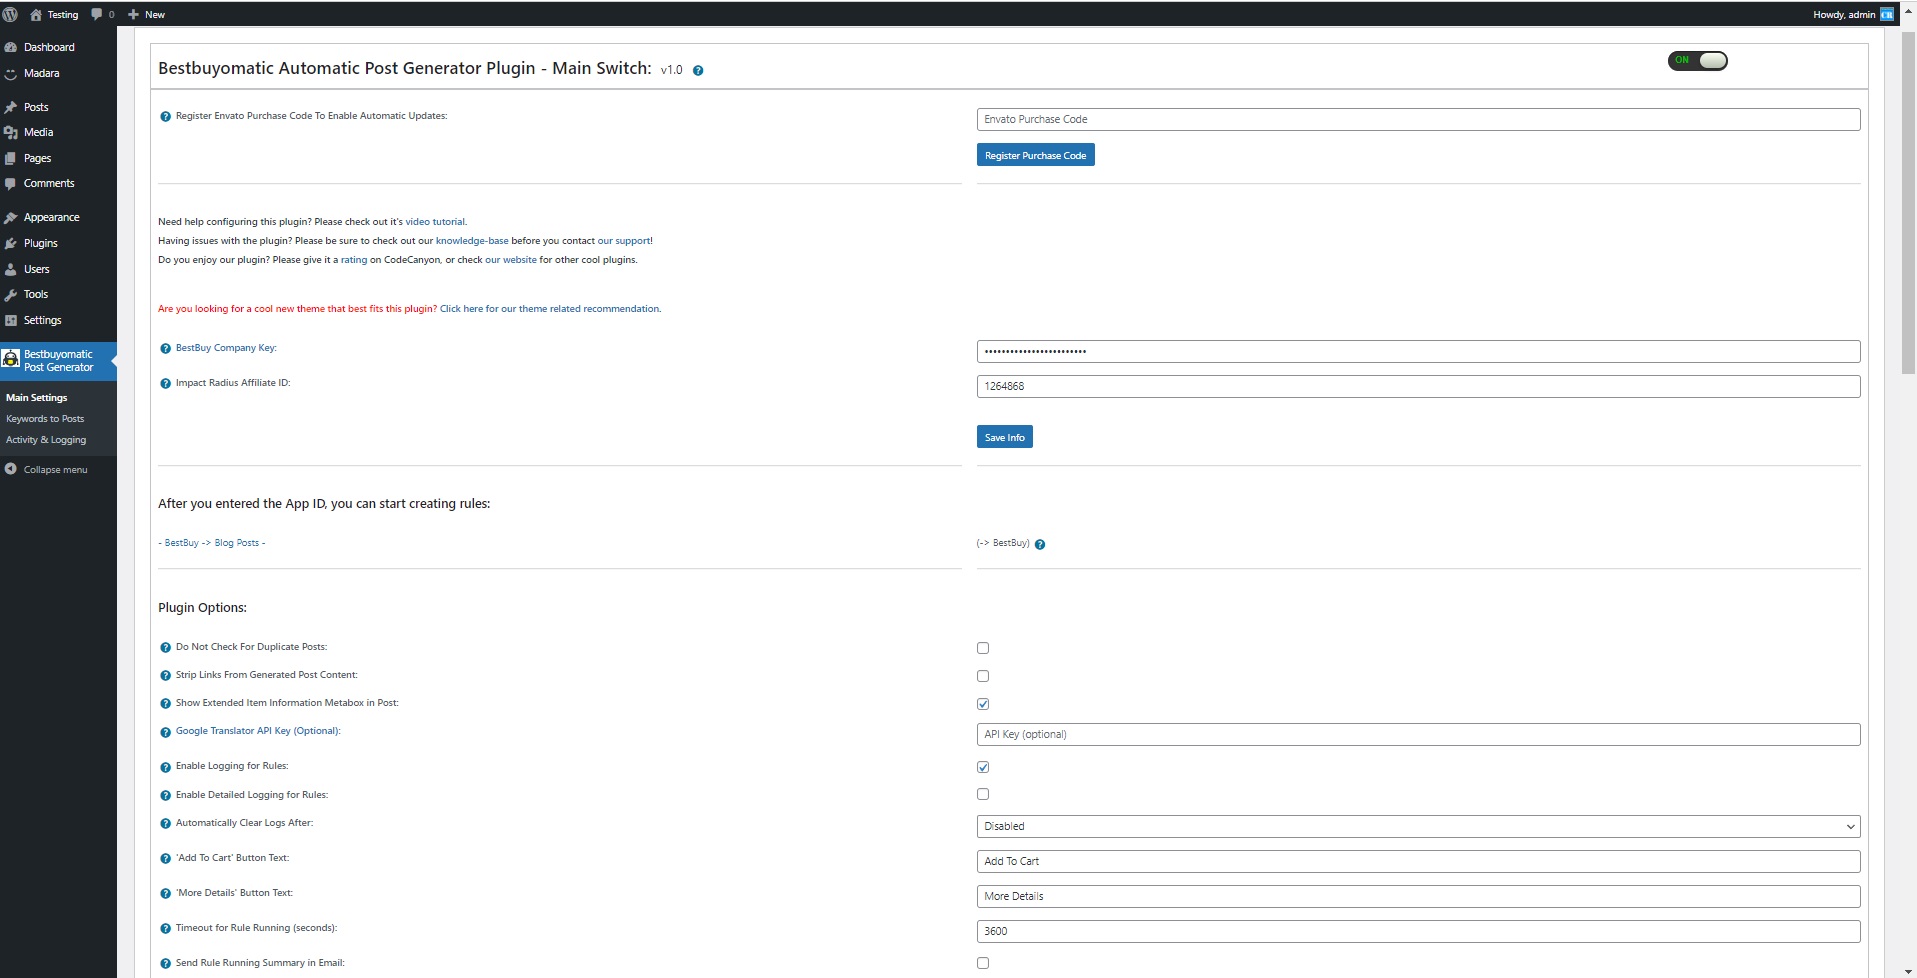
Main Settings:
- Bestbuyomatic Automatic Post Generator Main Switch: Enable or disable the Bestbuyomatic Automatic Post Generator. This acts like a main switch.
- BestBuy Company Key:: Insert your Best Buy API Key. Get one here.
- Impact Radius Affiliate ID: Insert your Best Buy Affiliate ID. Get one here. This is optional, but if you do not enter an affiliate key, you won’t earn revenue from product sales generated by your website.
- Do Not Check For Duplicate Posts: Choose if you want to skip checking for duplicate posts when publishing new posts (check this if you have 10000+ posts on your blog and you are experiencing slowdows when the plugin is running. If you check this, duplicate posts will be posted! So use it only when it is necesarry.
- Strip Links From Generated Post Content: Choose if you want to strip links from the generated post content.
- Show Extended Item Information Metabox in Post: Choose if you want to show an extended information metabox under every plugin generated post.
- Google Translator API Key (Optional): If you wish to use the official version of the Google Translator API for translation, you must enter first a Google API Key. Get one here. Please enable the ‘Cloud Translation API’ in Google Cloud Console. Translation will work even without even without entering an API key here, but in this case, an unofficial Google Translate API will be used.
- Enable Logging for Rules: Do you want to enable logging for rules?
- Enable Detailed Logging for Rules: Do you want to enable detailed logging for rules? Note that this will dramatically increase the size of the log this plugin generates.
- Automatically Clear Logs After: Choose if you want to automatically clear logs after a period of time.
- ‘Add To Cart’ Button Text: Set the ‘Add to cart’ button text. %%item_addToCartUrl%% shortcode.
- ‘More Details’ Button Text: Set the ‘More Details’ button text. %%item_read_more_button%% shortcode.
- Timeout for Rule Running (seconds): Set the timeout (in seconds) for every rule running. I recommend that you leave this field at it’s default value (3600).
- Send Rule Running Summary in Email: Choose if you want to receive a summary of the rule running in an email.
- Email Address: Input the email adress where you want to send the report. You can input more email addresses, separated by commas.
- Minimum Title Word Count: Set the minimum word count for post titles. Items that have less than this count will not be published. To disable this feature, leave this field blank.
- Maximum Title Word Count: Set the maximum word count for post titles. Items that have more than this count will not be published. To disable this feature, leave this field blank.
- Minimum Content Word Count: Set the minimum word count for post content. Items that have less than this count will not be published. To disable this feature, leave this field blank.
- Maximum Content Word Count: Set the maximum word count for post content. Items that have more than this count will not be published. To disable this feature, leave this field blank.
- Banned Words List: Do not include posts that’s title or content contains at least one of these words. Separate words by comma. To disable this feature, leave this field blank.
- Required Words List: Do not include posts that’s title or content does not contain at least one of these words. Separate words by comma. To disable this feature, leave this field blank.
- Strip HTML Elements from Final Content by ID: Strip HTML elements from final content that have this IDs. You can insert more IDs, separeted by comma. To disable this feature, leave this field blank.
- Strip HTML Elements from Final Content by Class: Strip HTML elements from final content that have this class. You can insert more classes, separeted by comma. To disable this feature, leave this field blank.
- Automatically Translate Content To: Do you want to automatically translate generated content using Google Translate?
- Skip Posts That Do Not Have Images: Choose if you want to skip posts that do not have images.
- Skip Posts Older Than a Selected Date: Choose if you want to skip posts that are older than a selected date.
- Choose if you want to skip posts that are older than a selected date. Select the date prior which you want to skip posts.
- Spin Text Using Word Synonyms: Do you want to randomize text by changing words of a text with synonyms using one of the listed methods? Note that this is an experimental feature and can in some instances drastically increase the rule running time!
- First List of Possible Sentences (%%random_sentence%%): Insert some sentences from which you want to get one at random. You can also use variables defined below. %something ==> is a variable. Each sentence must be sepparated by a new line.
- Second List of Possible Sentences (%%random_sentence2%%): Insert some sentences from which you want to get one at random. You can also use variables defined below. %something ==> is a variable. Each sentence must be sepparated by a new line.
- List of Possible Variables: Insert some variables you wish to be exchanged for different instances of one sentence. Please format this list as follows:Variablename => Variables (seperated by semicolon)Example:adjective => clever;interesting;smart;huge;astonishing;unbelievable;nice;adorable;beautiful;elegant;fancy;glamorous;magnificent;helpful;awesome
- Custom HTML Code #1: Insert a custom HTML code that will replace the %%custom_html%% variable. This can be anything, even an Ad code.
- Custom HTML Code #2: Insert a custom HTML code that will replace the %%custom_html2%% variable. This can be anything, even an Ad code.
- ID (Affiliate Keyword Replacer Tool Settings:) This is the ID of the rule.
- DEL (Affiliate Keyword Replacer Tool Settings:) Do you want to delete this rule?
- Search Keyword (Affiliate Keyword Replacer Tool Settings:) This keyword will be replaced with a link you define.
- Replacement Keyword (Affiliate Keyword Replacer Tool Settings:) This keyword will replace the search keyword you define. Leave this field blank if you only want to add an URL to the specified keyword.
- Link To Add (Affiliate Keyword Replacer Tool Settings:) Define the link you want to appear the defined keyword. Leave this field blank if you only want to replace the specified keyword without linking from it.
Best Buy Search to WordPress:
- ID This is the ID of the rule.
- Product Query The query based on which you want to search for products
- Schedule (Hours) Select the interval in hours after which you want this rule to run.
- Max Posts At A Time Select the maximum number of posts that this rule can create at once. 0-50 interval allowed..
- Del: Do you want to delete this rule?
- Post Status: Select the status that you want for the automatically generated posts to have.
- Item Type : Select the type (post/page) for your automatically generated item.
- Post Author : Select the author that you want to assign for the automatically generated posts.
- Active: Do you want to enable this rule? You can deactivate any rule (you don’t have to delete them to deactivate them).
- Info: The number of items (posts, pages) this rule has generated so far.
- Actions: Do you want to run this rule now? Note that only one instance of a rule is allowed at once.
Advanced Plugin Settings Dropdown Screen:
- Generated Post Title: Set the title of the generated posts for user rules. You can use the following shortcodes: %%random_sentence%%, %%random_sentence2%%, %%item_title%%, %%item_description%%, %%item_content%%, %%item_cat%%, %%item_tags%%
- Generated Post Content: Set the content of the generated posts for user rules. You can use the following shortcodes: %%item_get_intro%%, %%item_price%%, %%item_upc%%, %%item_features%%, %%item_details%%, %%item_modelNumber%%, %%item_customerRating%%, %%item_numReviews%%, %%item_addToCartUrl%%, %%item_media%%, %%custom_html%%, %%custom_html2%%, %%random_sentence%%, %%random_sentence2%%, %%item_title%%, %%item_description%%, %%item_content%%, %%item_content_plain_text%%, %%item_img_url%%, %%item_url%%, %%item_cat%%, %%item_tags%%, %%item_read_more_button%%, %%item_show_image%%, %%item_image_URL%%, %%author%%, %%author_link%%, %%author_email%%
- Cache Items For Continuous Posting (disable to get latest posts only): Do you want to remember last posted item and continue search from it the next time the importing rule runs?
- Search in Category: Select what category you wannt to search in.
- Sort Results: Sorting criteria, allowed sort types are [relevance, price, customer reviews, offer date]. Default sort is by relevance.
- Order Results: Sort ordering criteria, allowed values are [asc, desc].
- Skip First Results: Starting point of the results within the matching set of items – upto 10 items will be returned starting from this item. Default is 0.
- Limit Title Word Count: Do you want to limit the title’s lenght to a specific word count? To disable this feature, leave this field blank.
- Strip Images From Content: Do you want to strip images from generated content?
- Generated Post Format: If your template supports “Post Formats”, than you can select one here. If not, leave this at it’s default value.
- Additional Post Category: Select the post category that you want for the automatically generated posts to have.
- Automatically Add Post Categories From Items: Do you want to automatically add post categories from the feed items?
- Automatically Add Post Tags From Items: Do you want to automatically add post tags from the feed items?
- Additional Post Tags: Select the post tags that you want for the automatically generated posts to have.
- Enable Comments For Generated Posts: Do you want to enable comments for the generated posts?
- Enable Pingbacks/Trackbacks For Generated Posts: Do you want to enable pingbacks and trackbacks for the generated posts?
- Auto Get Featured Image: Do you want to set featured image for generated post (to the first image that was found in the post)?
- Default Featured Image if No Image Available for Item: Insert a link to a valid image that will be set for the featured image for the posts that do not have a valid image attached or if you disabled automatical featured image generation. To disable this feature, leave this field blank.
- Generate WooCommerce Meta Data: Do you want to generate WooCommerce specific metadata for each post (SKU, price, categories, tags).
- Post Custom Fields: Set the custom fields that will be set for generated posts. The syntax for this field is the following: custom_field_name1 => custom_field_value1, custom_field_name2 => custom_field_value2, … . In custom_field_valueX, you can use shortcodes, same like in post content. You can also assign the data to array custom fields, using this format: array_field[index_name1] => custom_field_value1, array_field[index_name2] => custom_field_value2. Example (without quotes): ‘title_custom_field => %%item_title%%’. You can use the following shortcodes: %%item_pub_date%%, %%custom_html%%, %%custom_html2%%, %%random_sentence%%, %%random_sentence2%%, %%item_title%%, %%item_description%%, %%item_content%%, %%item_content_plain_text%%, %%item_img_url%%, %%item_url%%, %%item_cat%%, %%item_tags%%, %%item_read_more_button%%, %%item_show_image%%, %%item_image_URL%%, %%author%%, %%author_link%%, %%author_email%%. If you defined custom tag names in the ‘Feed Item Custom Tag Names’ settings field in plugin’s ‘Main Settings’, you will also be able to use a shortcode for each inserted field name, in this format: %%custom_*field_name*%%
- Post Custom Taxonomies: Set the custom taxonomies that will be set for generated posts. The syntax for this field is the following: custom_taxonomy_name1 => custom_taxonomy_value1A, custom_taxonomy_value1B; custom_taxonomy_name2 => custom_taxonomy_value2A, custom_taxonomy_value2B; … . In custom_taxonomy_valueX, you can use shortcodes. Example (without quotes): ‘cats_taxonomy_field => manualtax1, %%item_title%%; tags_taxonomy_field => manualtax2, %%item_title%%’. You can use the following shortcodes: %%item_pub_date%%, %%custom_html%%, %%custom_html2%%, %%random_sentence%%, %%random_sentence2%%, %%item_title%%, %%item_description%%, %%item_content%%, %%item_content_plain_text%%, %%item_img_url%%, %%item_url%%, %%item_cat%%, %%item_tags%%, %%item_read_more_button%%, %%item_show_image%%, %%item_image_URL%%, %%author%%, %%author_link%%, %%author_email%%. If you defined custom tag names in the ‘Feed Item Custom Tag Names’ settings field in plugin’s ‘Main Settings’, you will also be able to use a shortcode for each inserted field name, in this format: %%custom_*field_name*%%
Activity and Loggind Screen:
- Rules Currently Running: These rules are currently running on your server.
- Restore Plugin Default Settings: Hit this button and the plugin settings will be restored to their default values. Warning! All settings will be lost!
- Delete All Posts Generated by this Plugin: Hit this button and all posts generated by this plugin will be deleted!
- Activity Log: This is the main log of your plugin. Here will be listed every single instance of the rules you run or are automatically run by schedule jobs (if you enable logging, in the plugin configuration).
How to customize resulting posts with built in shortcodes?
You can use the following shortcodes in post title and content editing:
- %%random_sentence%% – generates a random sentence (as you have defined them in plugin config.) More on how to configure the random sentence generator, check plugin documentation (down)
- %%random_sentence2%% – generates a random sentence (from the second geenrator) (as you have defined them in plugin config.) More on how to configure the random sentence generator, check plugin documentation (down)
- %%item_customerRating%% – the customer rating of the item
- %%item_numReviews%% – the number of reviews of the item
- %%item_modelNumber%% – the model number of the item
- %%item_upc%%- upc of the item
- %%item_media%% – the item’s images
- %%item_price%% – the price of the item
- %%item_addToCartUrl%% – a link that will add the current item to cart, with your affiliate tracking code added
- %%custom_html%% – includes the custom HTML you defined in the Main Settings interface (Custom HTML Code #1:)
- %%custom_html2%% – includes the custom HTML you defined in the Main Settings interface (Custom HTML Code #2:)
- %%item_img_url%% – the url of the item’s main image
- %%item_title%% – the title of the item
- %%item_content%% – the content of the description of the item
- %%item_content_plain_text%% – the content of the description of the item in plain text (no html)
- %%item_excerpt%% – the excerpt of the item
- %%item_url%% – the URL of the item
- %%item_cat%% – the categories of the item
- %%item_tags%% – the tags of the item
- %%item_features%% – the features of the item
- %%item_details%% – the details of the item
- %%item_read_more_button%% – a read more button (links to Best Buy item page, with affiliate ID added)
- %%item_show_image%% – displays the item’s image
How to work with ‘Random Sentence Generator’?
You can use the Random Sentence Generator by inserting list of sentences to the ‘First List of Possible Sentences (%%random_sentence%%)’ text field. Here, you can add full sentences, or sentences with variables. Variables are structured as: %something. A possible list of sentences can be:
- Meet this %adjective %noun %sentence_ending
- This is the %adjective %noun ever%sentence_ending
- I %love_it %nouns , because they are the %adjective %sentence_ending
- My %family says this plugin is very %adjective %sentence_ending
- These %nouns are quite %adjective %sentence_ending
You can define variables in the ‘List of Possible Variables:’ textfield. Here you can define values to variables, values which will be used in the random sentence forming. Variables can be defined as follows:
variable_name1 => variable_value1;variable_value2;variable_value3

variable_name2 => variable2_value1;variable2_value2;variable2_value3
You can also use variables in variable definition. Example:
noun_with_adjective => %noun;%adjective %noun
An example of variable definition:
adjective_very => %adjective;very %adjective;

adjective => clever;interesting;smart;huge;astonishing;unbelievable;nice;adorable;beautiful;elegant;fancy;glamorous;magnificent;helpful;awesome

noun_with_adjective => %noun;%adjective %noun

noun => plugin;WordPress plugin;item;ingredient;component;constituent;module;add-on;plug-in;addon;extension

nouns => plugins;WordPress plugins;items;ingredients;components;constituents;modules;add-ons;plug-ins;addons;extensions

love_it => love;adore;like;be mad for;be wild about;be nuts about;be crazy about

family => %adjective %family_members;%family_members

family_members => grandpa;brother;sister;mom;dad;grandma

sentence_ending => .;!;!!
These random sentences can be used in post titles or post content, by adding the %%random_sentence%% or %%random_sentence2%% shortcode.
Summary
Bestbuyomatic Automatic Post Generator is a simple, yet powerful tool you can use to create an autoblog with ease. The setup and settings of the plugin couldn’t have been easier. Now, let’s go and enjoy the results of this great plugin! Have fun using it!
Sources and Credits
This component was made by Szabi CodeRevolution, for more information and support contact us at support@coderevolution.ro
Once again, thank you so much for purchasing this item. As I said at the beginning, I’d be glad to help you if you have any questions regarding this plugin and I’ll do my best to assist.
CodeRevolution