“FaceLive - Live Stream Broadcaster for WordPress” Help by CodeRevolution
“FaceLive - Live Stream Broadcaster for WordPress Help”
Created: 11/09/2018
By: CodeRevolution
Email: support@coderevolution.ro
Thank you for purchasing our plugin. If you have any questions that are beyond the scope of this help file, please feel free to email via our email. Thanks so much!
Table of Contents
About this plugin - top
FaceLive - Live Stream Broadcaster Plugin for WordPress is a breaking edge (made in 2018) is a Facebook Live Video streaming tool which allows you to go live on Facebook with pre-recorded videos. You can go live directly on your account/page/group or create a live event for the stream, to increase views. Facebook live stream broadcaster plugin is ideal for increasing your Facebook account/page/group views count in no time, with the help of your WordPress blog. It uses the Facebook native PHP API to boost your Facebook account/page/group's traffic!Our intuitive, easy-to-use system allows you to simply embed videos in posts that you publish on your blog, and these videos will be automatically be streamed LIVE, to your Facebook account/page/group.
Thanks to it's ground breaking methods, live videos generated by this plugin will generate interest for your website, by Facebook video viewers and commenters.
Using this plugin, you can automatically generate Facebook live videos based pre-recorded videos embedded in posts you publish (manually or automatically) to your blog.
The goal is to achieve the following:
FaceLive - Live Stream Broadcaster will pulbish live video streams to Facebook Live. It will promote your account/page/group by increasing viewer engagement.
Plugin features:
- Go Live on Facebook with pre-recorded videos (Facebook, Vimeo, Twitch, Facebook, Dailymotion or local videos, embedded in published posts)
- Create Live Events to increase engagement or simply stream to your Facebook account/page/group's live feed
- Broadcasted live videos will be save to your Facebook video library, so they will continue to generate views even after they were broadcasted
- Customize generated live video's title and description
- Detailed plugin activity logging
- Manually post live videos for older posts on your blog
This plugin needs a Facebook OAuth Key and Secret for it's WordPress->Facebook functionality. How to get one?
How to get the Oauth credentials?
- Go to https://developers.google.com/ and log in or create an account, if necessary.
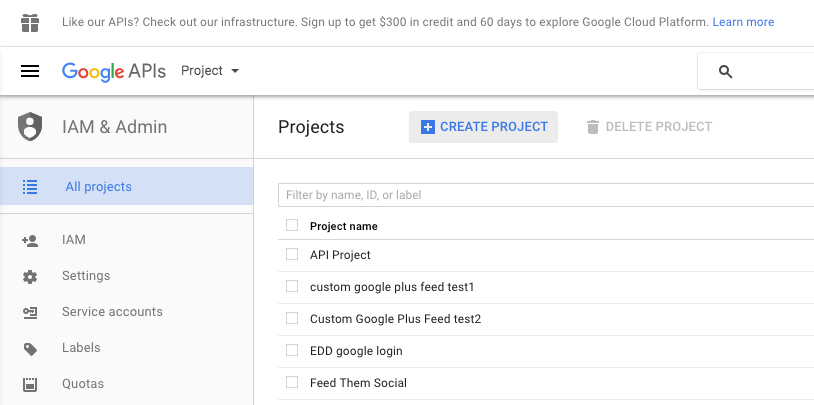
- After logging in go to this link https://console.developers.google.com/project and click on the blue CREATE PROJECT button as depicted in the photo below. Wait a moment as google prepares your project.
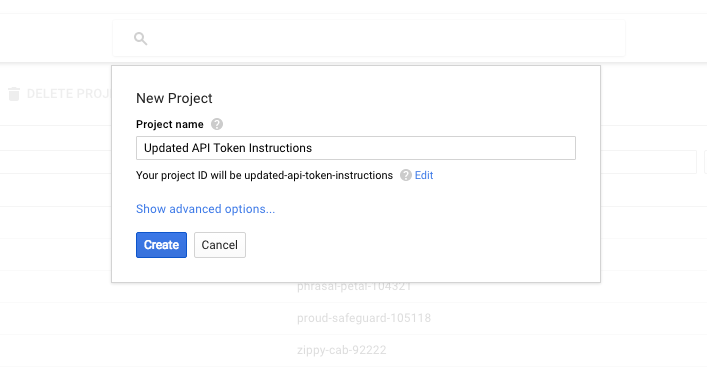
- Fill in whatever Project Name you want.
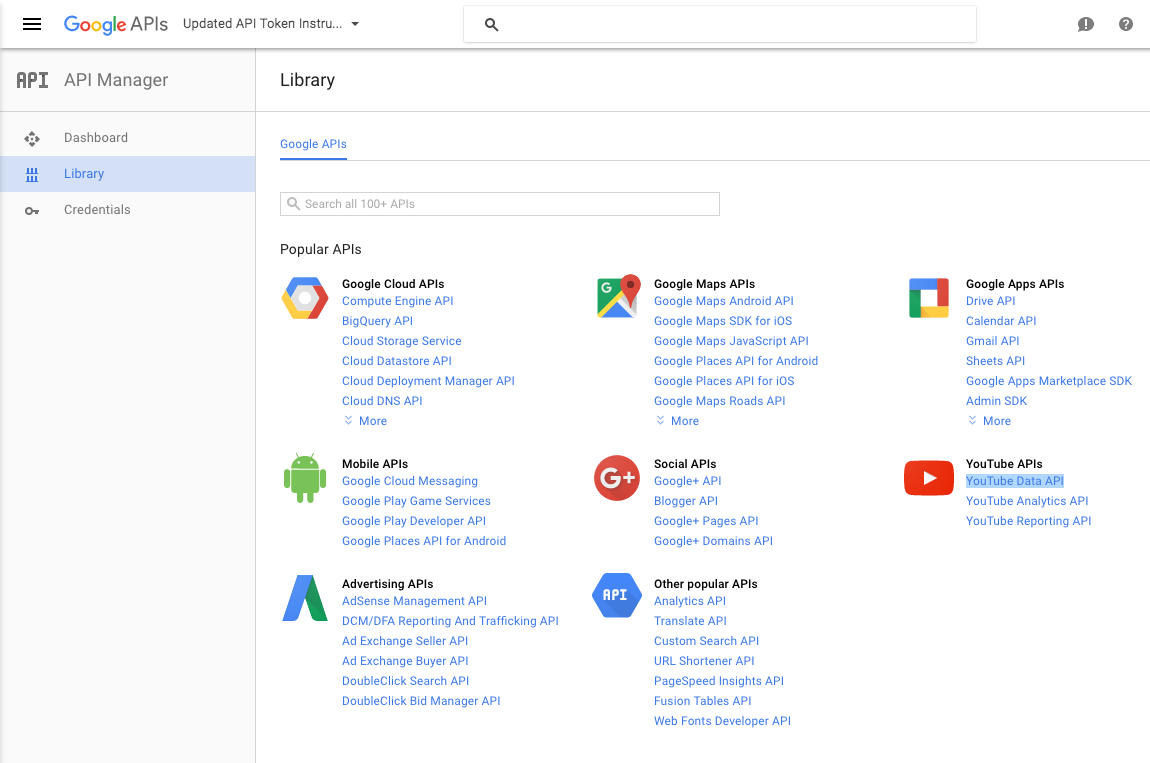
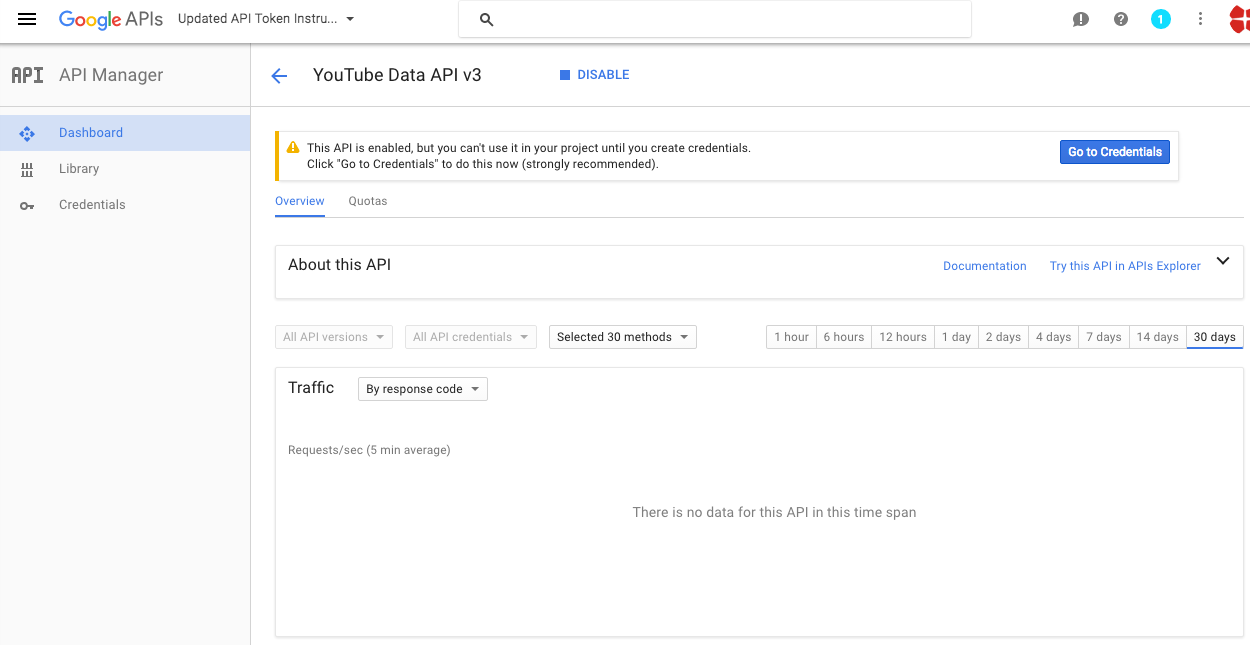
- Then click on the link option called 'Facebook Data API.' It's under Facebook API's. You can see it highlighted in the photo below, bottom right.
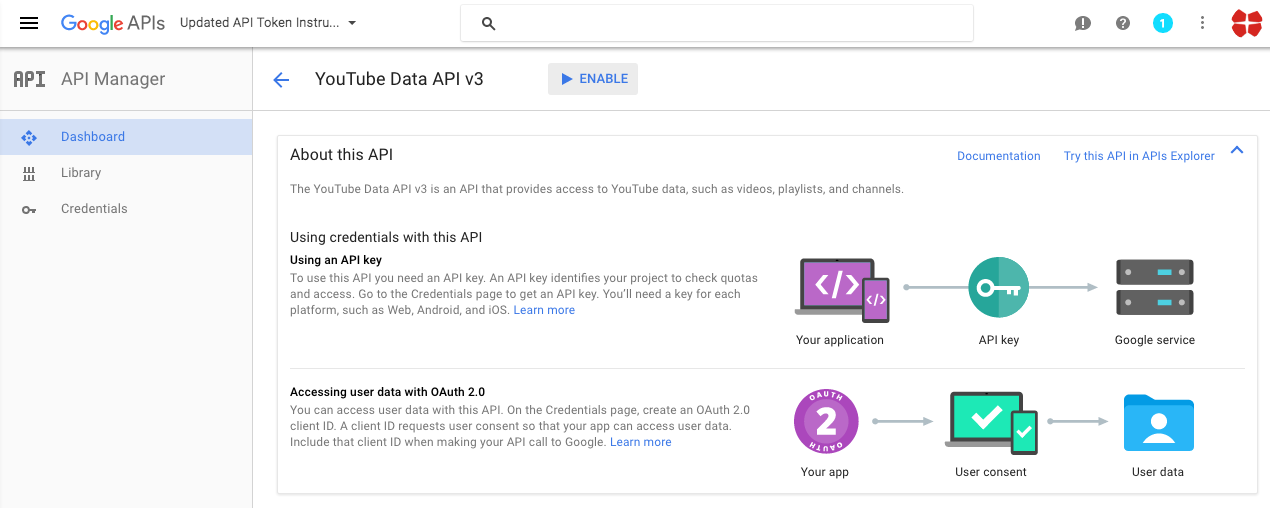
- Now click on the 'ENABLE' button.
- Next click on the blue 'Go to Credentials' button to the right.
 With the Client ID and Client Secret your application can connect to your Google Project
How to get the OAuth Key and Secret?
- Create a developer account at https://console.developers.google.com/
- Login with your developer account at https://console.developers.google.com/
- Click "Create Project"
- Fill in your project name
 . Optional: below 'Show advanced options' you can choose where the project will run. Either in the US or Europe
 - Click "Create".
Google will now create your project this will take a minute. - In the left menu select 'APIs & auth' > 'Consent screen'

The consent screen is the authentication prompt for the user when it wants to use your application. - Select for email address your developer account and fill in a product name. All other fields are optional.
- Click "Save".
- Select in the left menu 'APIs & auth' > 'APIs'
 Here you can add APIs to your project to access different google services.
 - Select or search for an API you want to use.
- Click "Enable API",
- Select in the left menu 'APIs & auth' > 'Credentials'
 Here you will create the authentication tokens for your application.
 - Click "Create new Client ID".
- Select 'Web application'.
- At 'Authorized JavaScript origins' fill in the host address of your web application. This can only be one URL, preferably your WordPress root URL.
- At 'Authorized redirect URIs' fill in the URL path where you want to handle the authentication !!! this must be YOUR_WP_ROOT_URL/wp-admin/admin.php?page=youtubomatic_youtube_panel&yt_auth_done=true (the plugin will tell you want to enter in this field - or the error message at authorization will).

- Click "Create Client ID"
Plugin requirements:
- FFMPEG installed on server
- PHP 5.4 or higher
- allow_url_fopen=1
- php CURL extension (install to Debian/Ubuntu etc with apt-get install php5-curl )
Wordpress installation - top
YouTube video tutorial:
I also provided a Quick Install Guide to feature an easy plugin installation for everyone.
To make this plugin work, first, you'll need to install the plugin. The easiest method is to take the .zip file you've downloaded and upload it via Plugins > Add New > Upload Plugin in the WordPress Dashboard. Once the plugin is installed, be sure to Activate it.
Now that you've installed and activated the plugin, you'll see a new menu item created inside WordPress called 'FaceLive - Live Stream Broadcaster'. First thing first, let's head over to Settings > FaceLive - Live Stream Broadcaster and take a look at what options are available.
Plugin Settings - top
Refreshingly, FaceLive - Live Stream Broadcaster has a super-simple settings screen. Let's look at first at the settings panel:

Here you can find the steps needed in configuring your plugin even if you have no HTML knowledge at all. You can find options for:
HINT! Don't forget to click the Save button every time you modified your settings, otherwise the modifications will be lost!
Main Settings:
- FaceLive - Live Stream Broadcaster Main Switch: Enable or disable the FaceLive - Live Stream Broadcaster. This acts like a main switch.
- Facebook OAuth2 Secret: Insert your Facebook OAuth Secret. Learn how to get one here. This is used when posting from Facebook to WordPress.
- FFMPEG Path On Server Please insert the path to the ffmpeg executable from your server. If you leave this blank, the default 'ffmpeg' will be used. On many servers, this can be different, like: /usr/local/bin/ffmpeg
- Maximum Allowed Video Size (Mb): Please insert the maximum video size in Mb, that you wish to upload to Facebook Live. To disable this feature, leave this field blank.
- Enable Warning Notice And Progress Bar at Post Publish: Choose if you want to enable or disable the 'Please wait while FaceLive - Live Stream Broadcaster plugin uploads videos to Facebook!' notice in the publish page interface in WordPress.
- Timeout for Live Stream Publishing (seconds): Set the timeout (in seconds) for every live stream publishing process. I recommend that you leave this field at it's default value (3600).
- Enable Logging for Rules: Do you want to enable logging for rules?
- Enable Detailed Logging for Rules: Do you want to enable detailed logging for rules? Note that this will dramatically increase the size of the log this plugin generates.
- Automatically Clear Logs After: Choose if you want to automatically clear logs after a period of time.
- Web Proxy Address: If you want to use a proxy to crawl webpages, input it's address here. Required format: IP Address/URL:port
- Web Proxy Authentication: If you want to use a proxy to crawl webpages, and it requires authentication, input it's authentication details here. Required format: username:password.
- Shorten Exported URLs To Facebook Using Bitly: Insert your Bitly API generic access token. To get a generic access token, please click the menu icon on the top right of the web (after you log in) -> click the '>' sign next to your account name -> click the 'Generic Access Token' menu entry -> enter your password in the 'Password' field and click 'Generate Token'. Copy the resulting token here.
- Spin Text Using Word Synonyms: Do you want to randomize text by changing words of a text with synonyms using one of the listed methods? Note that this is an experimental feature and can in some instances drastically increase the rule running time!
- First List of Possible Sentences (%%random_sentence%%): Insert some sentences from which you want to get one at random. You can also use variables defined below. %something ==> is a variable. Each sentence must be sepparated by a new line.
- Second List of Possible Sentences (%%random_sentence2%%): Insert some sentences from which you want to get one at random. You can also use variables defined below. %something ==> is a variable. Each sentence must be sepparated by a new line.
- List of Possible Variables: Insert some variables you wish to be exchanged for different instances of one sentence. Please format this list as follows:Variablename => Variables (seperated by semicolon)Example:adjective => clever;interesting;smart;huge;astonishing;unbelievable;nice;adorable;beautiful;elegant;fancy;glamorous;magnificent;helpful;awesome
Comments to Facebook:
- Delay Posting By (Seconds): Do you want delay posting with this amount of seconds from post publish? This will create a single cron job for each post (cron is a requirement for this to function). If you leave this field blank, posts will be automatically published on post creation.
- Schedule Live Event Instead Of Streaming Directly To Profile's Live Stream: Select if you want to schedule a live event each time the plugin creates a new video stream (check this), or if you wish to stream directly to the profile's live stream, each time the plugin streams a video (check this). In this case, only one video can be stream at a time.
- Facebook Video Broadcast Title Template: Choose the template of your Facebook Broadcast title. This will appear in the 'Event Manager', in Facebook settings. You can use the following shortcodes: %%blog_title%%, %%author_name%%, %%post_cats%%, %%post_tags%%, %%post_title%%, %%post_excerpt%%.
- Facebook Video Broadcast Description Template: Choose the template of your Facebook Broadcast description. This will appear in the 'Event Manager', in Facebook settings. You can use the following shortcodes: %%featured_image%%, %%blog_title%%, %%author_name%%, %%post_link%%, %%random_sentence%%, %%random_sentence2%%, %%post_cats%%, %%post_tags%%, %%post_title%%, %%post_content%%, %%post_excerpt%%.
- Facebook Video Stream Title Template: Choose the template of your Facebook Stream title. This will be saved as a video after the stream is finished. You can use the following shortcodes: %%blog_title%%, %%author_name%%, %%post_cats%%, %%post_tags%%, %%post_title%%, %%post_excerpt%%.
- Set Video Thumbnail as Post's Featured Image: Do you want to set the video's thumbnail as the post's featured image?
- Video Status: Select the status of the posted videos on Facebook.
- Video Format: Select the video format.
- Video Width: Select the video width.
- Video Height: Select the video height.
- Video Height: Select the video height.
- Video Frame Rate: Set the frame rate of the created video. If you leave this field blank, the default 30 fps will be used.
- Maximum Number of Videos At Once: Select the maximum number of videos to be uploaded at once.
- Disable Autoposting of 'Posts': Do you want to disable automatically posting of WordPress 'posts' to Facebook?
- Disable Autoposting of 'Pages': Do you want to disable automatically posting of WordPress 'pages' to Facebook?
- Disable Autoposting of 'Custom Post Types': Do you want to disable automatically posting of WordPress 'custom post types' to Facebook?
- Disable Autoposting of Selected Categories: Do you want to disable automatically posting of WordPress 'posts' to Facebook?
- Disable Autoposting of Selected Tags: Input the tags for which you want to disable posting. You can enter more tags, separated by comma. Ex: cars, vehicles, red, luxury. To disable this feature, leave this field blank.
- Allow Only Internal Videos: Do you want to allow to post to Facebook only links from content that are only on your local hosting (including media library)? If you uncheck this, any link that points to a valid video file will be posted automatically to Facebook. This settings reffers only to linked video files (not Facebook or Vimeo links).
- Try to Upload Linked Facebook Videos From Content: Do you want to try to upload Facebook videos that are embedded from your content? Warning! This will upload to your account/page/group any Facebook video that you link in your post content. This is an experimental feature, use it on your own risk.
- Try to Upload Linked Vimeo Videos From Content Do you want to try to upload Vimeo videos that are embedded from your content? Warning! This will upload to your account/page/group any Facebook video that you link in your post content. This is an experimental feature, use it on your own risk.
- Try to Upload Linked DailyMotion Videos From Content Do you want to try to upload DailyMotion videos that are embedded from your content? Warning! This will upload to your account/page/group any Facebook video that you link in your post content. This is an experimental feature, use it on your own risk.
- Try to Upload Linked Facebook Videos From Content Do you want to try to upload Facebook videos that are embedded from your content? Warning! This will upload to your account/page/group any Facebook video that you link in your post content. This is an experimental feature, use it on your own risk.
- Try to Upload Linked Twitch Videos From Content Do you want to try to upload Twitch clips that are embedded from your content? Warning! This will upload to your account/page/group any Facebook video that you link in your post content. This is an experimental feature, use it on your own risk.
- Help! App is authorized and still no new live videos are appearing on Facebook? In this case you can try the following:1) Reauthorize the App. Simply click the 'Reauthorize' button and follow the steps given.2) Create a new App OAuth Key and Secret and try linking the new one in the plugin.
Activity and Loggind Screen:
- Restore Plugin Default Settings: Hit this button and the plugin settings will be restored to their default values. Warning! All settings will be lost!
- Activity Log: This is the main log of your plugin. Here will be listed every single instance of the rules you run or are automatically run by schedule jobs (if you enable logging, in the plugin configuration).
How to customize resulting posts with built in shortcodes?
You can use the following shortcodes in live video title and description editing: %%post_title%%, %%post_content%%, %%post_link%%, %%post_cats%%, %%post_tags%%, %post_excerpt%%, %%featured_image%%, %%author_name%%, %%blog_title%%, %%random_sentence%%, %%random_sentence2%%.
- %%random_sentence%% - generates a random sentence (as you have defined them in plugin config.) More on how to configure the random sentence generator, check plugin documentation (down)
- %%random_sentence2%% - generates a random sentence (from the second geenrator) (as you have defined them in plugin config.) More on how to configure the random sentence generator, check plugin documentation (down)
- %%post_title%% - the title of the published post
- %%post_content%% - the content of the published post
- %%post_link%% - the link of the published post
- %%post_cats%% - the categories of the published post
- %%post_tags%% - the tags of the published post
- %%post_excerpt%% - the excerpt of the published post
- %%featured_image%% - the featured images of the published post
- %%author_name%% - the name of the author of the published post
- %%author_name%% - the excerpt of the published post
- %%blog_title%% - the title of the blog
How to work with 'Random Sentence Generator'?
You can use the Random Sentence Generator by inserting list of sentences to the 'First List of Possible Sentences (%%random_sentence%%)' text field. Here, you can add full sentences, or sentences with variables. Variables are structured as: %something. A possible list of sentences can be:
- Meet this %adjective %noun %sentence_ending
- This is the %adjective %noun ever%sentence_ending
- I %love_it %nouns , because they are the %adjective %sentence_ending
- My %family says this plugin is very %adjective %sentence_ending
- These %nouns are quite %adjective %sentence_ending
variable_name1 => variable_value1;variable_value2;variable_value3

variable_name2 => variable2_value1;variable2_value2;variable2_value3
You can also use variables in variable definition. Example:
noun_with_adjective => %noun;%adjective %nounAn example of variable definition:
adjective_very => %adjective;very %adjective;

adjective => clever;interesting;smart;huge;astonishing;unbelievable;nice;adorable;beautiful;elegant;fancy;glamorous;magnificent;helpful;awesome

noun_with_adjective => %noun;%adjective %noun

noun => plugin;WordPress plugin;item;ingredient;component;constituent;module;add-on;plug-in;addon;extension

nouns => plugins;WordPress plugins;items;ingredients;components;constituents;modules;add-ons;plug-ins;addons;extensions

love_it => love;adore;like;be mad for;be wild about;be nuts about;be crazy about

family => %adjective %family_members;%family_members

family_members => grandpa;brother;sister;mom;dad;grandma

sentence_ending => .;!;!!
These random sentences can be used in post titles or post content, by adding the %%random_sentence%% or %%random_sentence2%% shortcode.
Summary - top
FaceLive - Live Stream Broadcaster is a simple, yet powerful tool you can use to create automatical live videos on Facebook, with ease. The setup and settings of the plugin couldn't have been easier. Now, let's go and enjoy the results of this great plugin! Have fun using it!
Sources and Credits - top
This component was made by Szabi CodeRevolution, for more information and support contact us at support@coderevolution.ro
Once again, thank you so much for purchasing this item. As I said at the beginning, I'd be glad to help you if you have any questions regarding this plugin and I'll do my best to assist.
CodeRevolution